-
Shop
- Forward Lighting Bundles
- Rear Visibility Bundles
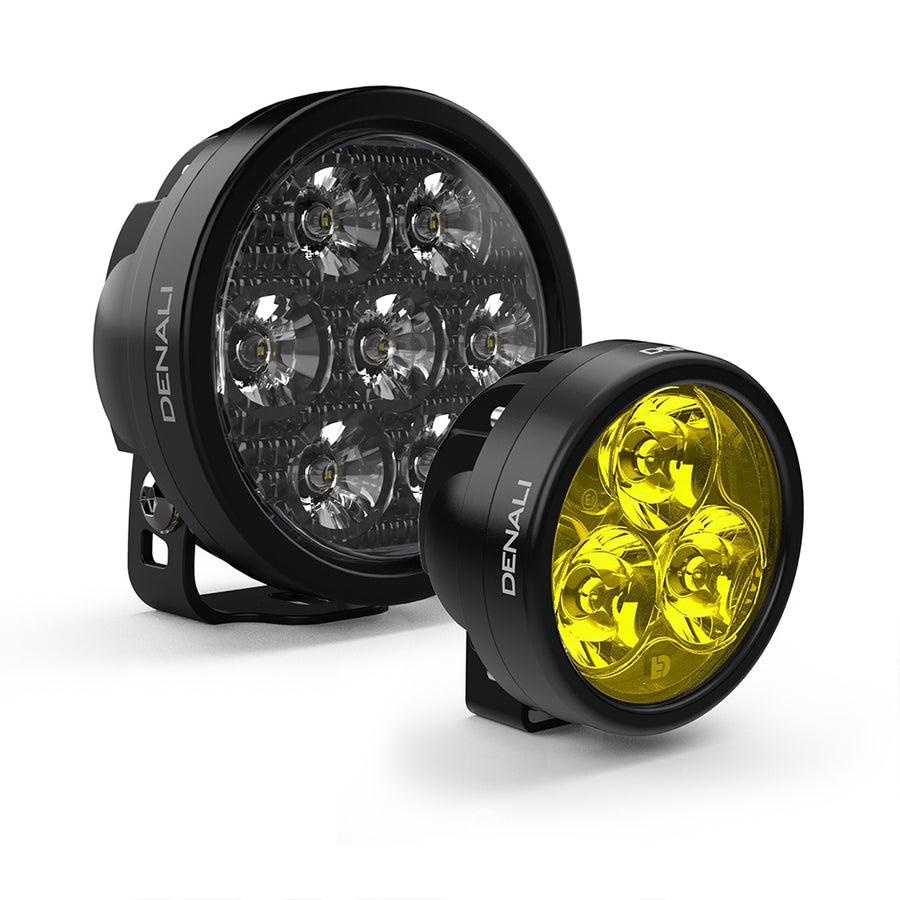
- Driving Lights
- Headlights
- LED Bulbs
- Fog Lights
- Brake Lights
- Turn Signals
- Daytime Running Lights
- Amber & Yellow Lens Kits
- Driving Light Wiring
LED Lighting
-
Explore
- News
- Why Choose DENALI
- 2.0 Lighting Technology
- Beam Patterns
- How to aim
- Product Certifications
- Replacement Parts
- 2026 Catalog Download
DENALI 101
- ADV Moto Outfitting Guides
- Enduro Moto Outfitting Guide
- Street & V-Twin Outfitting Guides
- Side X Side Outfitting Guides
- 4x4 Outfitting Guides
Outfitting Guides

- Dealers
- About Us


Shop by Vehicle

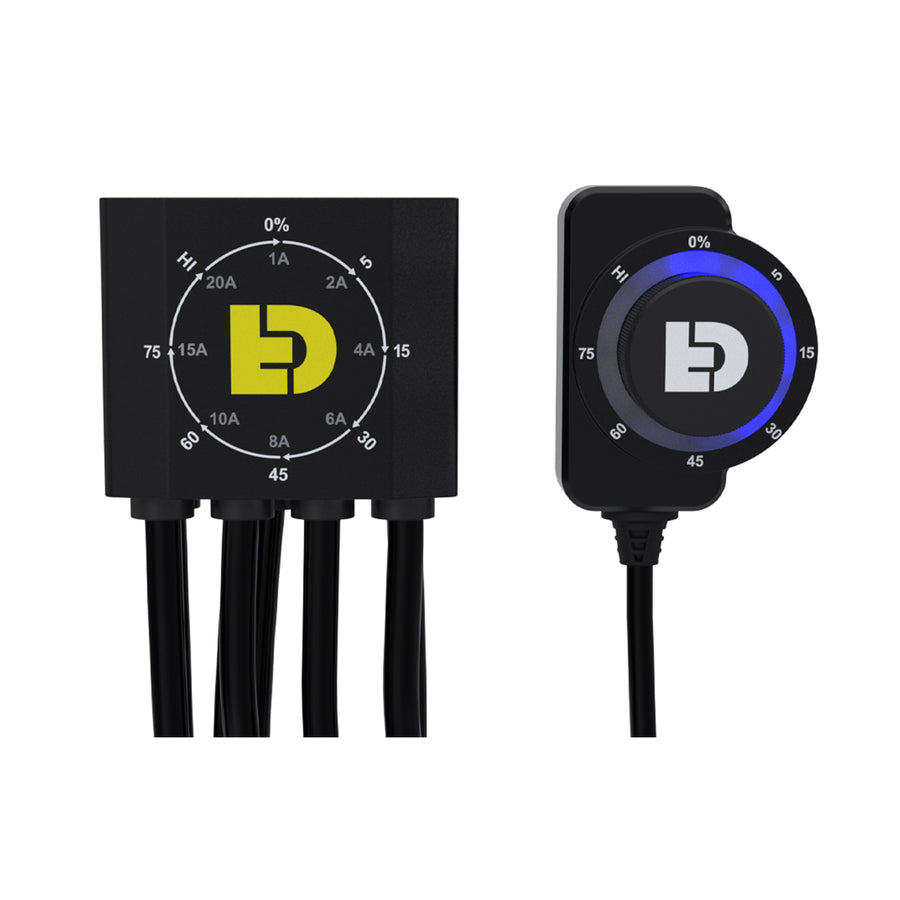
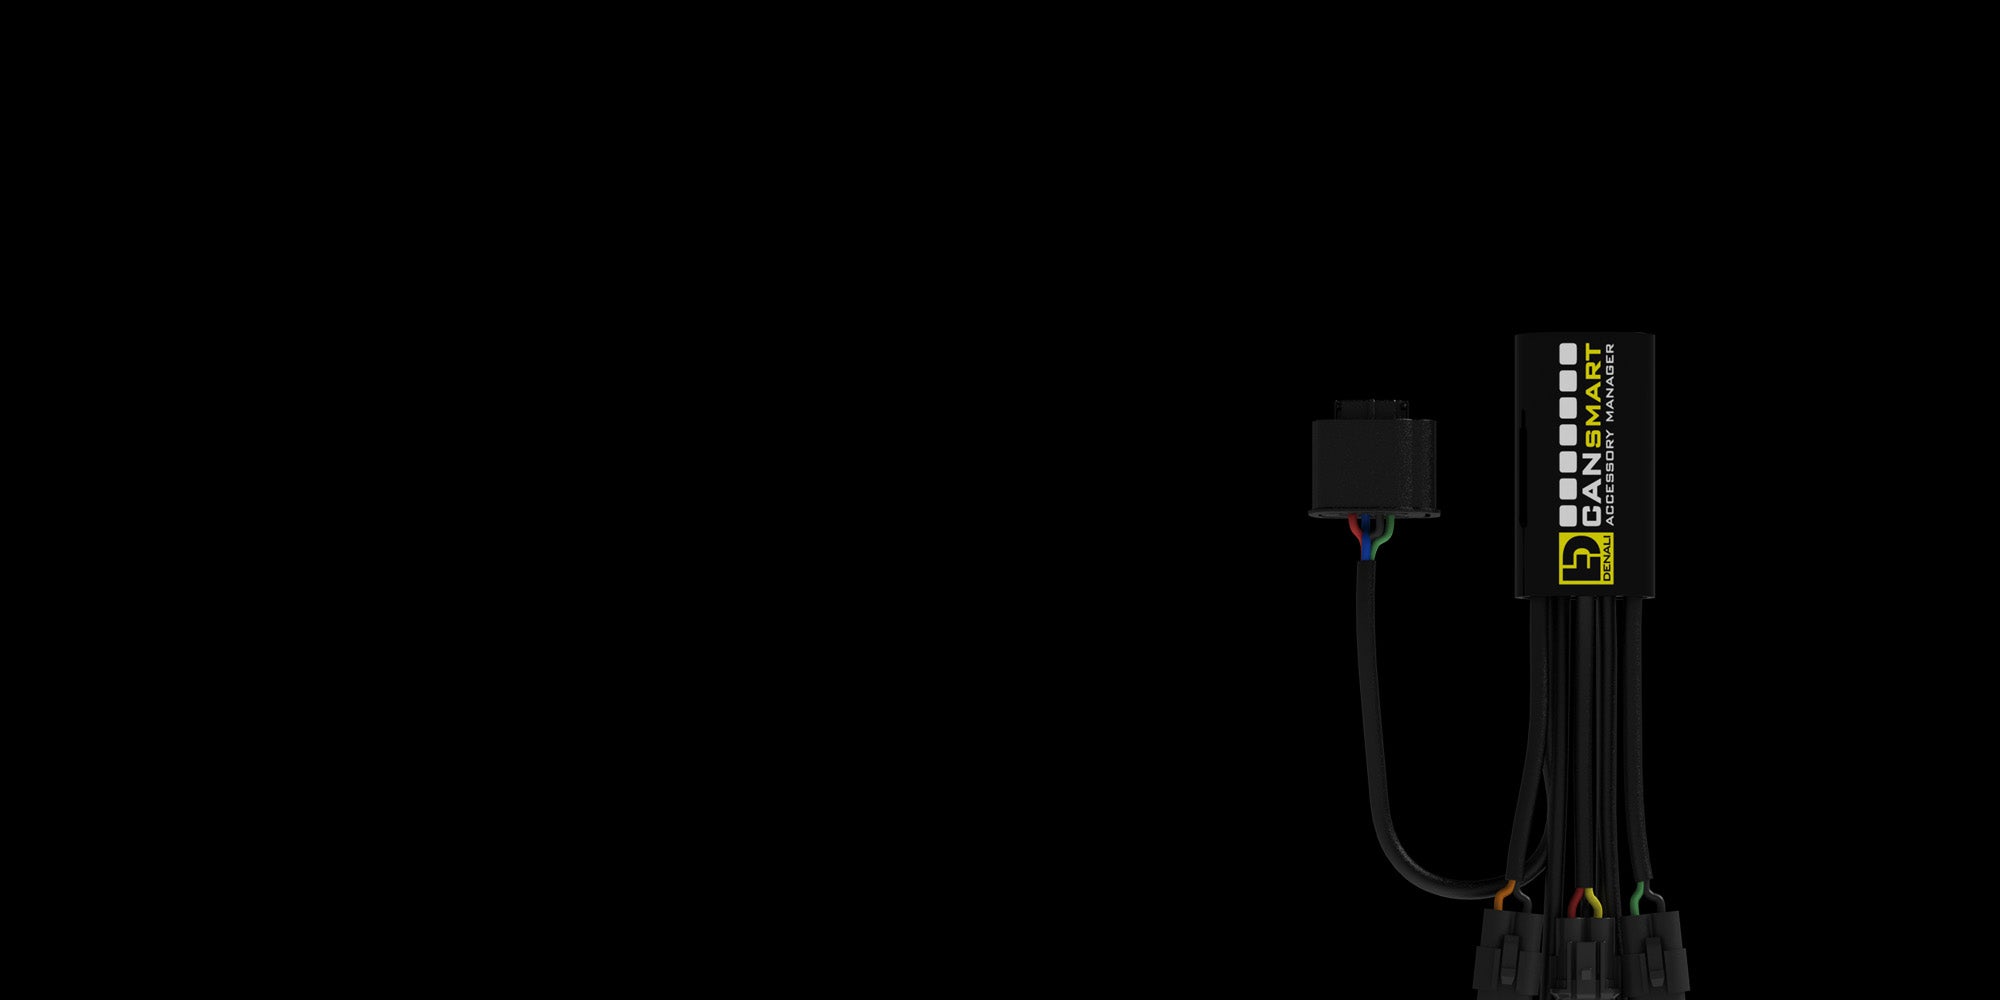
BMW CANsmart™ Controller
Our ground-breaking CANsmart™ Controller provides plug-n-play installation of up to four accessories to enable dozens of customizable settings that can be controlled right from your BMW's wonder-wheel or our Accessory Manager Software.
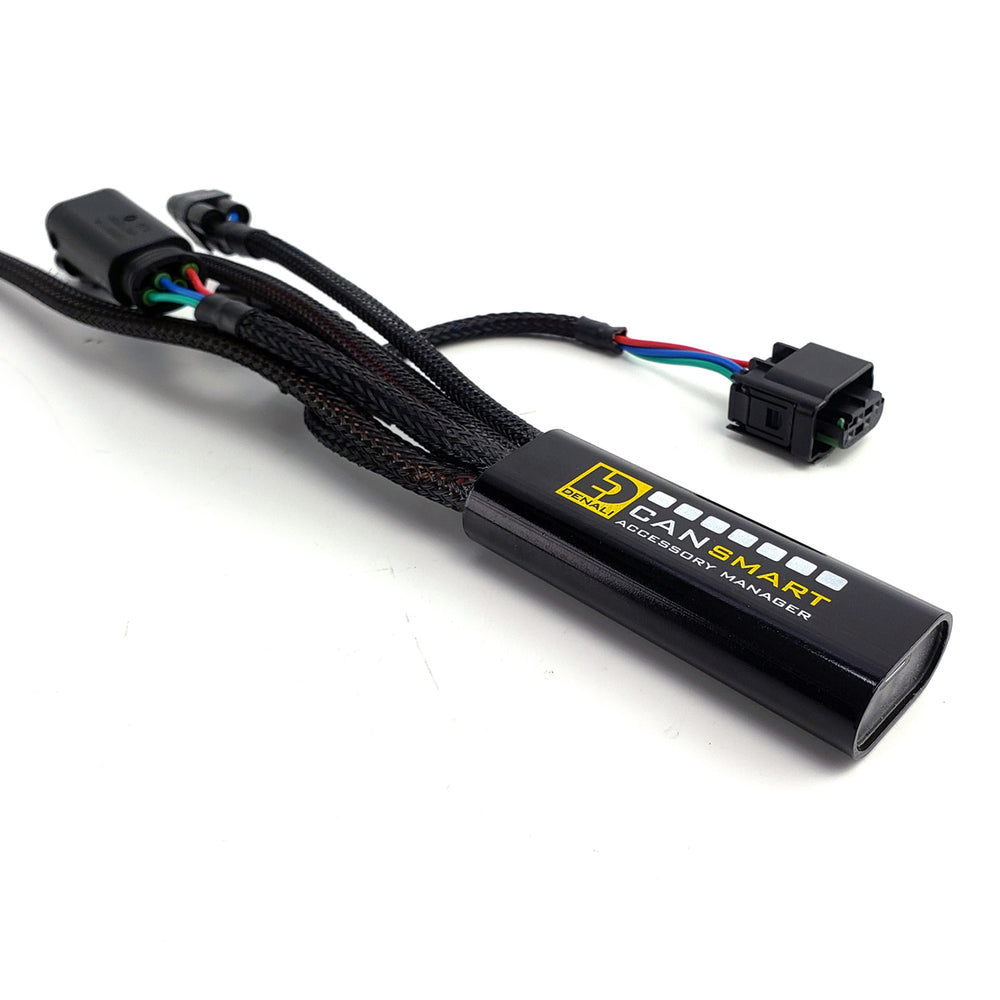
4 Accessory Circuits, Over 35 Custom Features and Settings
Simply connect the CANsmart™ Controller to your BMW's TPMS connector to access over 35 programmable accessory settings designed to control auxiliary lights, turn signals, horns, brake lights, or any accessory you can imagine.
Control OEM accessories, 3rd party accessories or use the included wiring harnesses for plug & play connection to DENALI driving lights, DRLs, SoundBomb Horns and B6 Brake Lights.

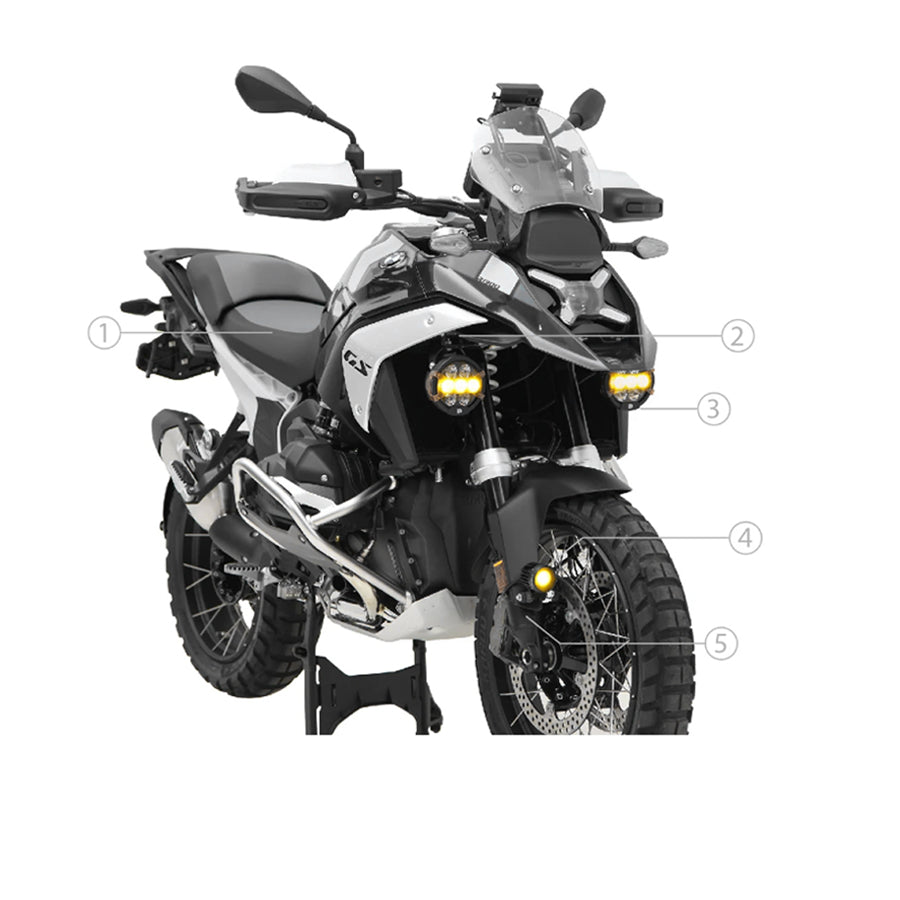
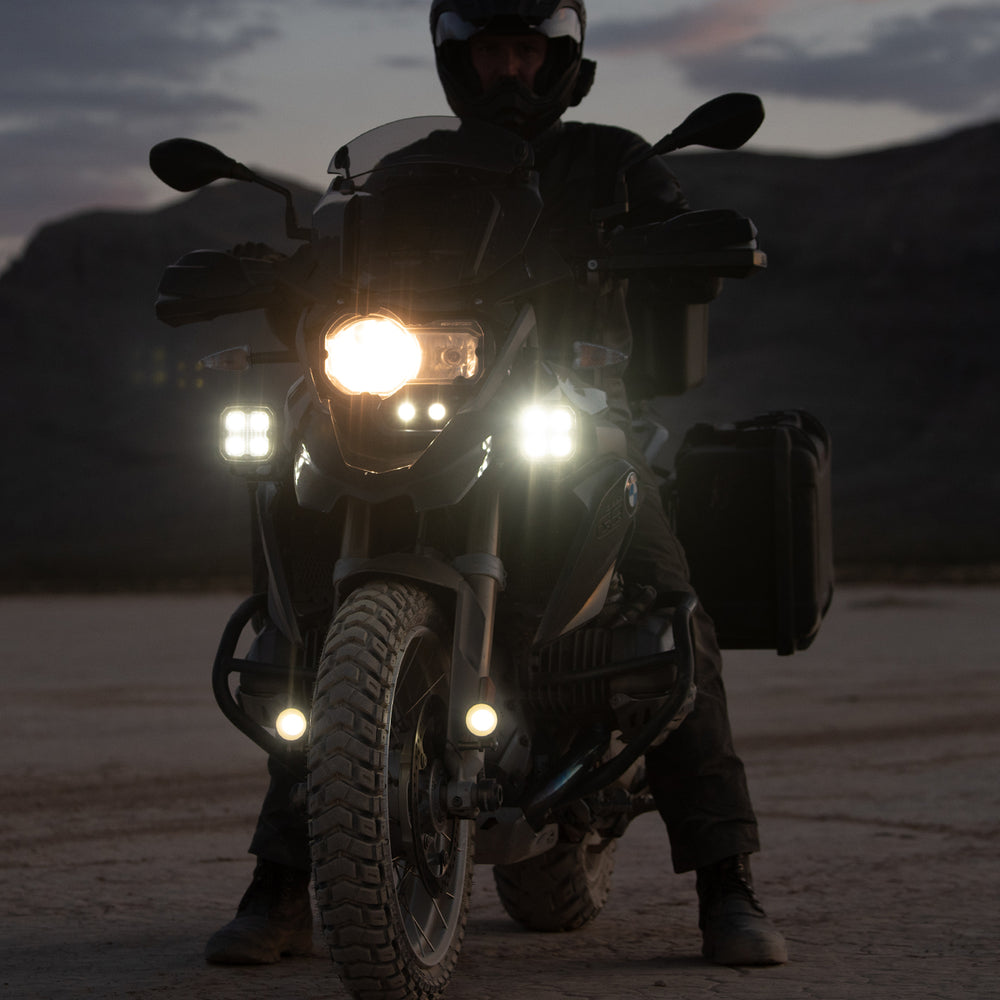
Auxiliary Lighting
Dimming, strobe, modulate, and "cancel with turn signal" are just a few of the settings available for LED auxiliary lights and DRLs.
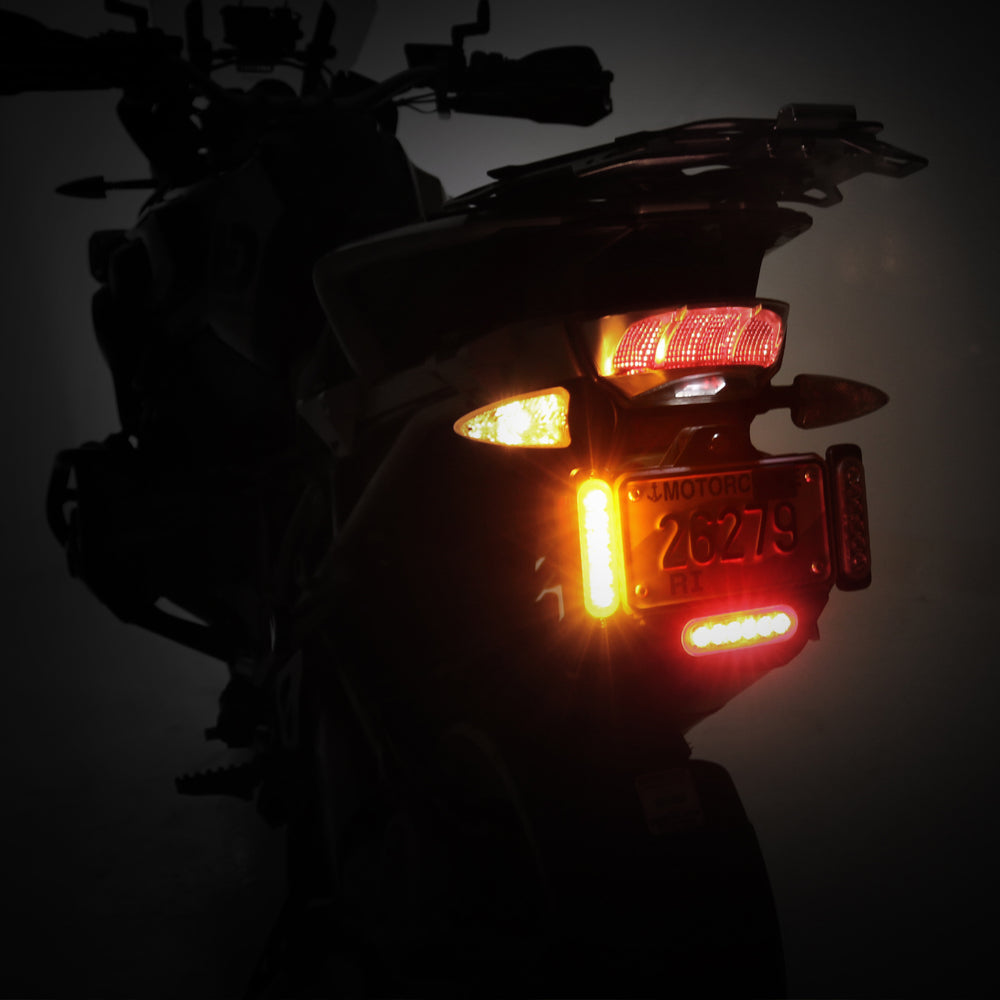
Brake & Turn Lighting
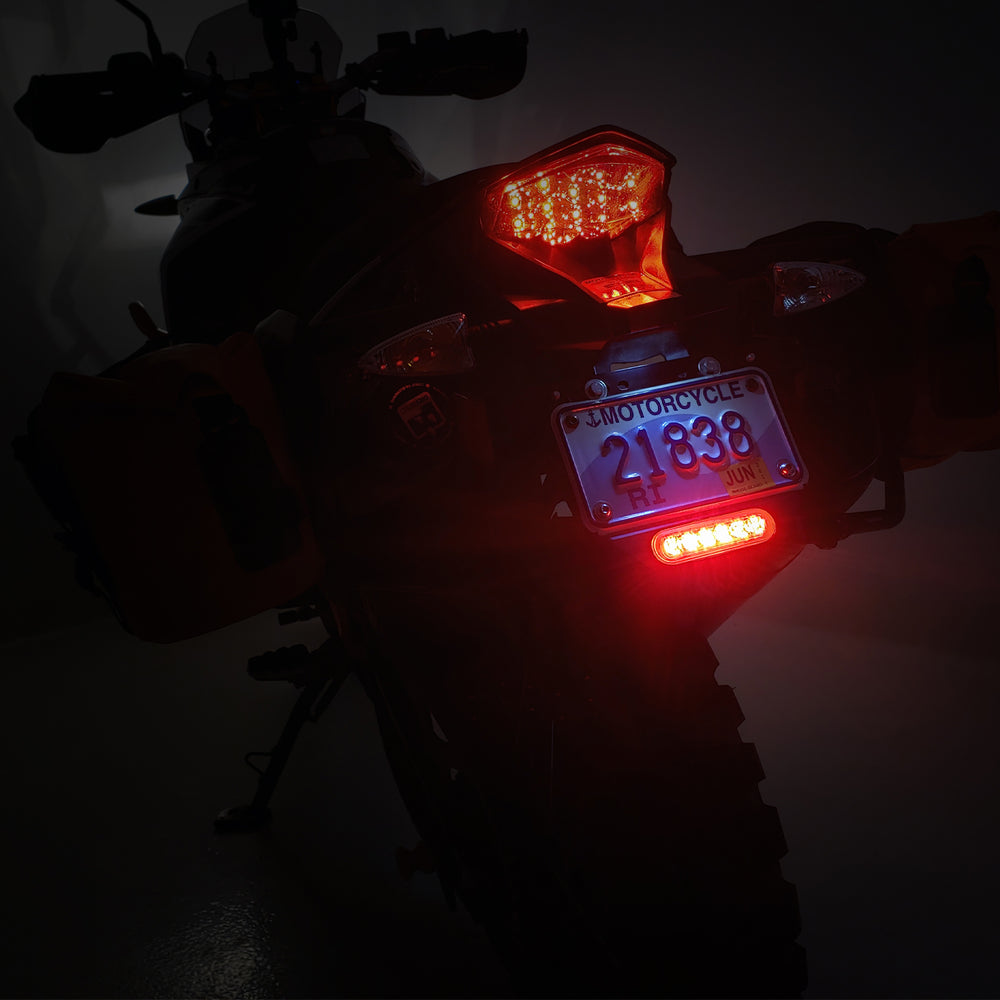
The intelligent brake light circuit enables multiple flash pattern braking and deceleration activated "smart brake" technology.

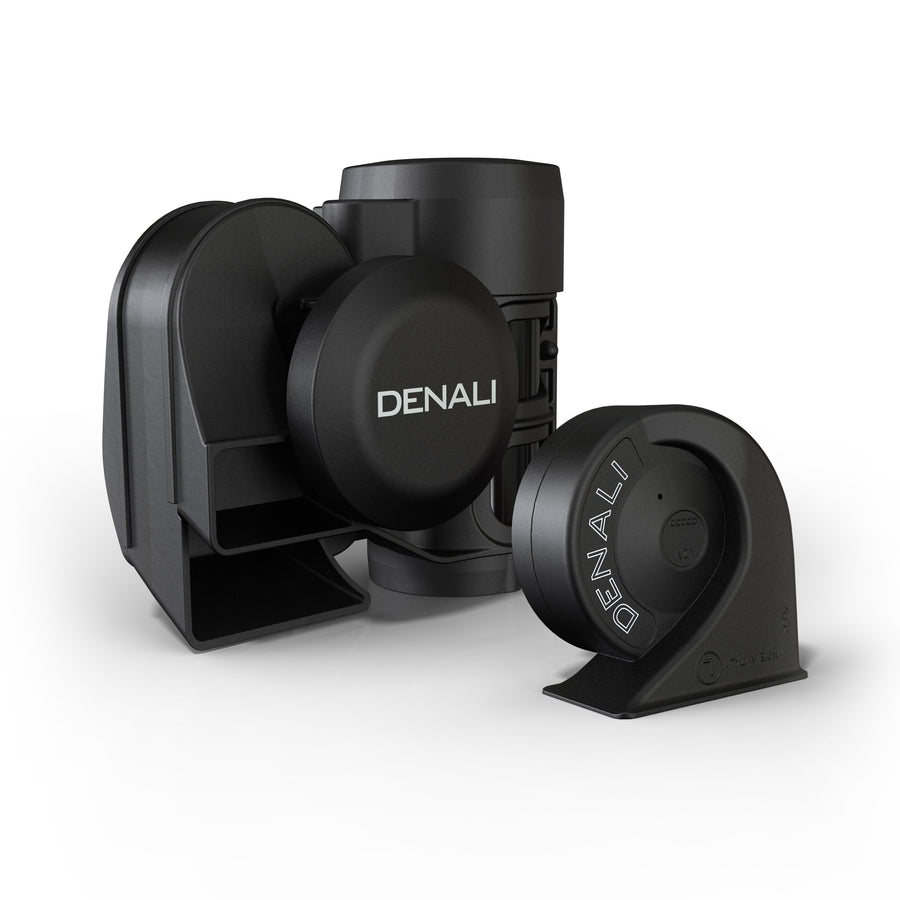
Horns & Safety
Connect a high power SoundBomb™ horn without the need for a relay, and set your auxiliary lights to strobe when you sound your horn.

Other Accessories
When set to accessory mode you can power a phone charger, GPS or heated gear to name a few. Each output provides up to 25 peak amps (10 amps continuous).
DENALI CANsmart™ CANbus Controller
Intelligent Accessory Control
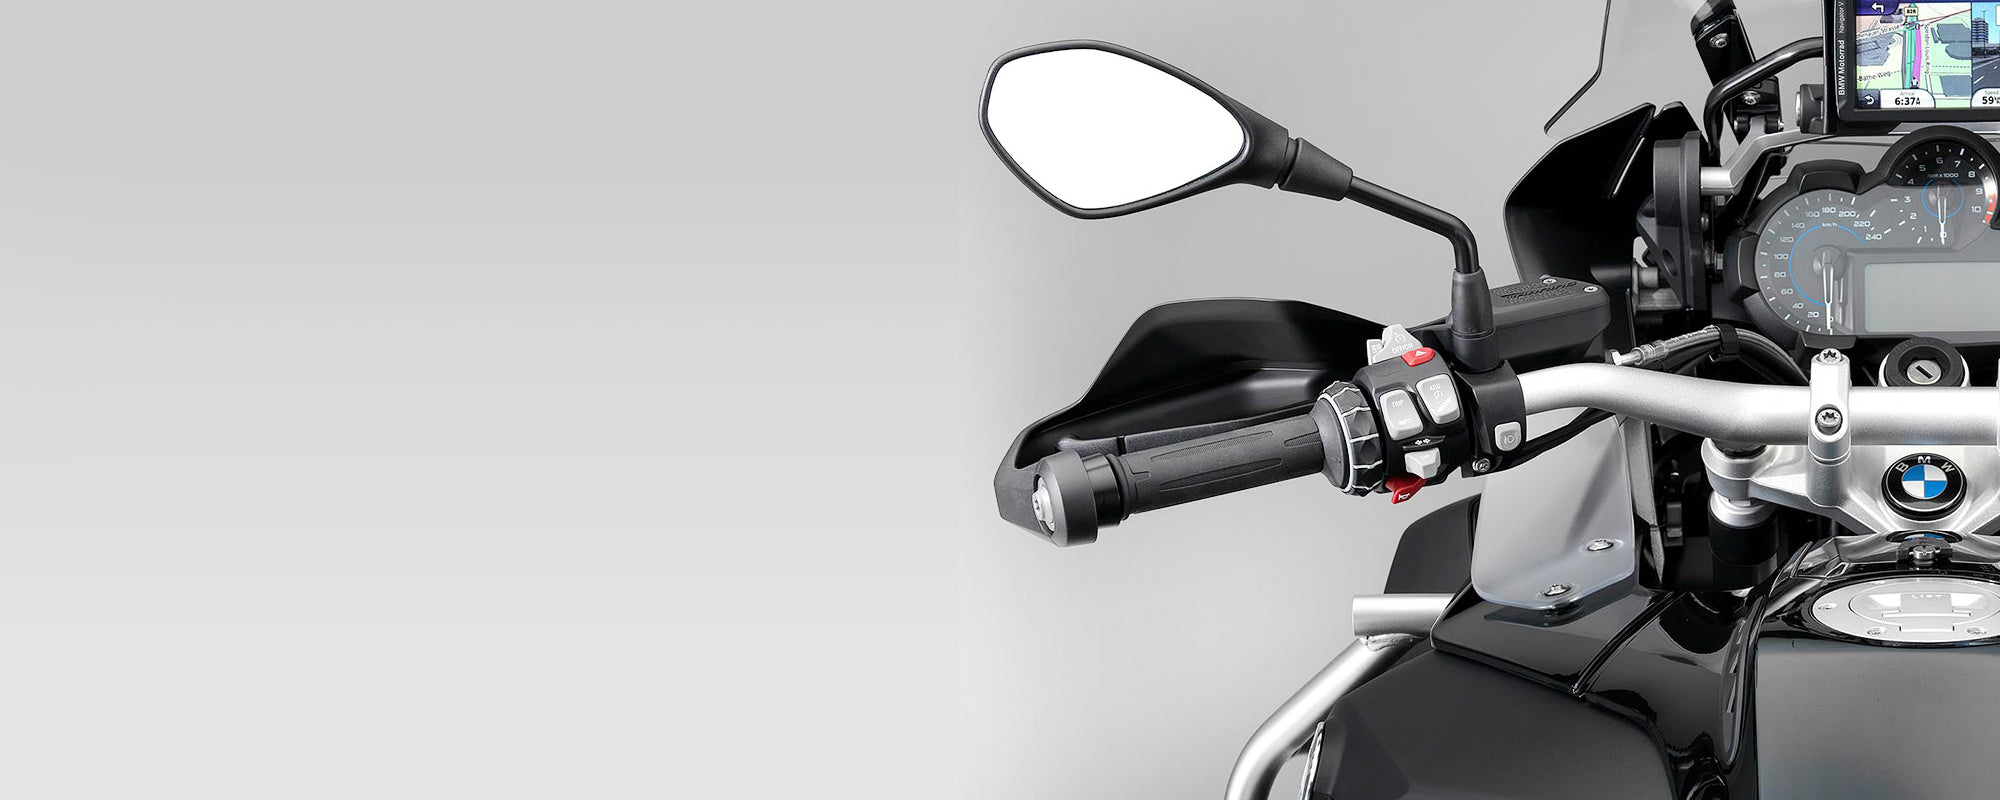
Independently control and dim up to two sets of LED lights right from the BMW wonder-wheel. Click the turn signal cancel three times to turn lights on/off, or hold the wonder-wheel left/right to enter dimming mode where you can scroll between 10% - 100% intensity.
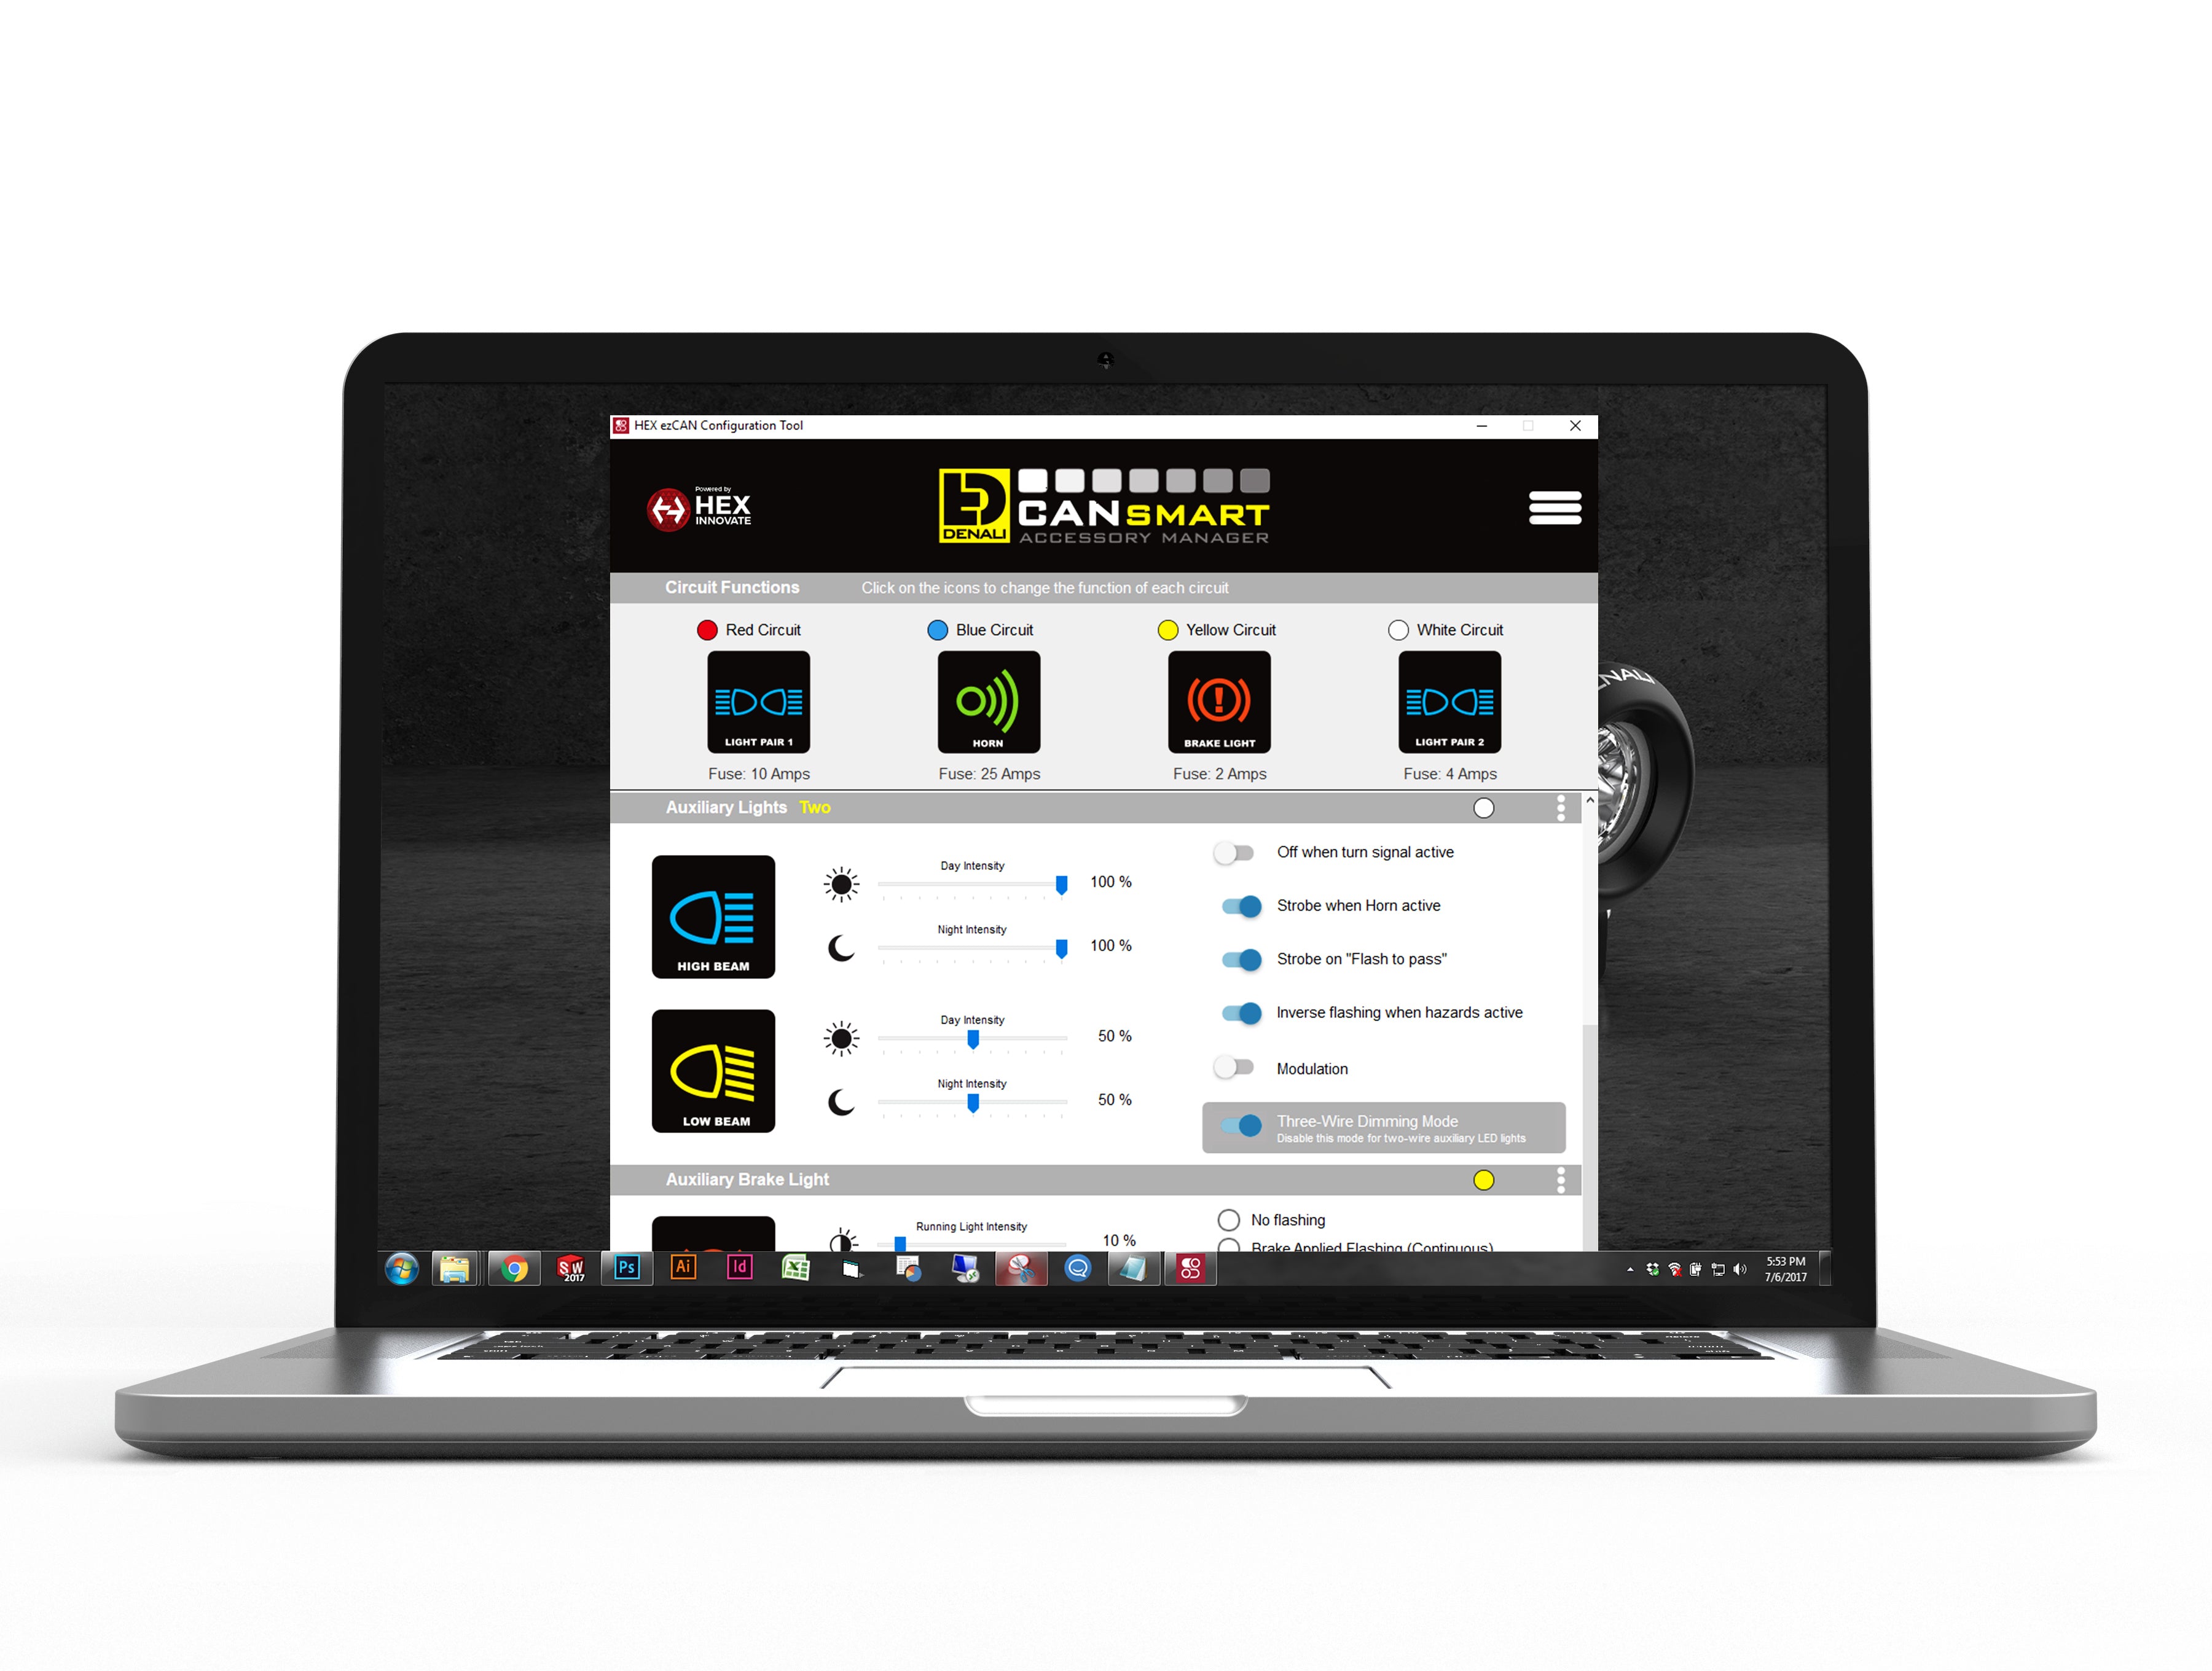
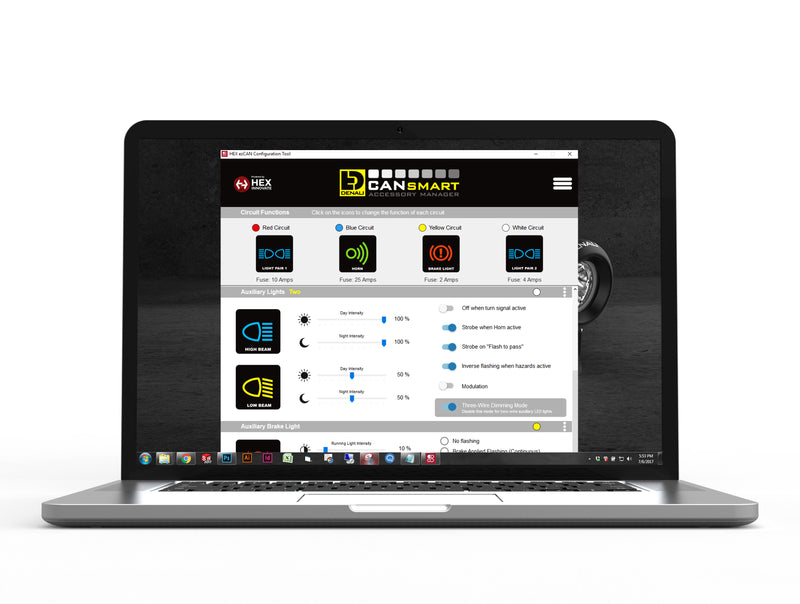
CANsmart™ Accessory Manager Software
Our free Accessory Manager Software lets you set each of the four circuits to control what ever accessory type you want. Once selected, you can choose between dozens of features and settings to customize each accessory type to match your riding style. You can also set each circuits electronic fuses which, if tripped, will automatically reset with a cycle of the ignition.

Features & Settings
Auxiliary Light Features
High/Low Sync
Set auxiliary lights to switch between a programmable high/low setting with the factory high beam switch.
On/OFF and Dim
Independently control two sets of lights on/off and intensity level (for both day and night) from our waterproof dimmer switch.
Modulate Lights
Set auxiliary lights to modulate during the day to increase your visibility to other motorists.
Flash to Pass
Need to get someones attention? Pulse your high beam switch three times and your auxiliary lights will strobe three times fast.
Cancel With Turn Signal / Flash as Turn Signal
This feature cancels the corresponding auxiliary light when you turn your turn signal on preventing powerful auxiliary lights from overpowering your signal. You can also set amber lights to flash as a turn signal.
Horn Features
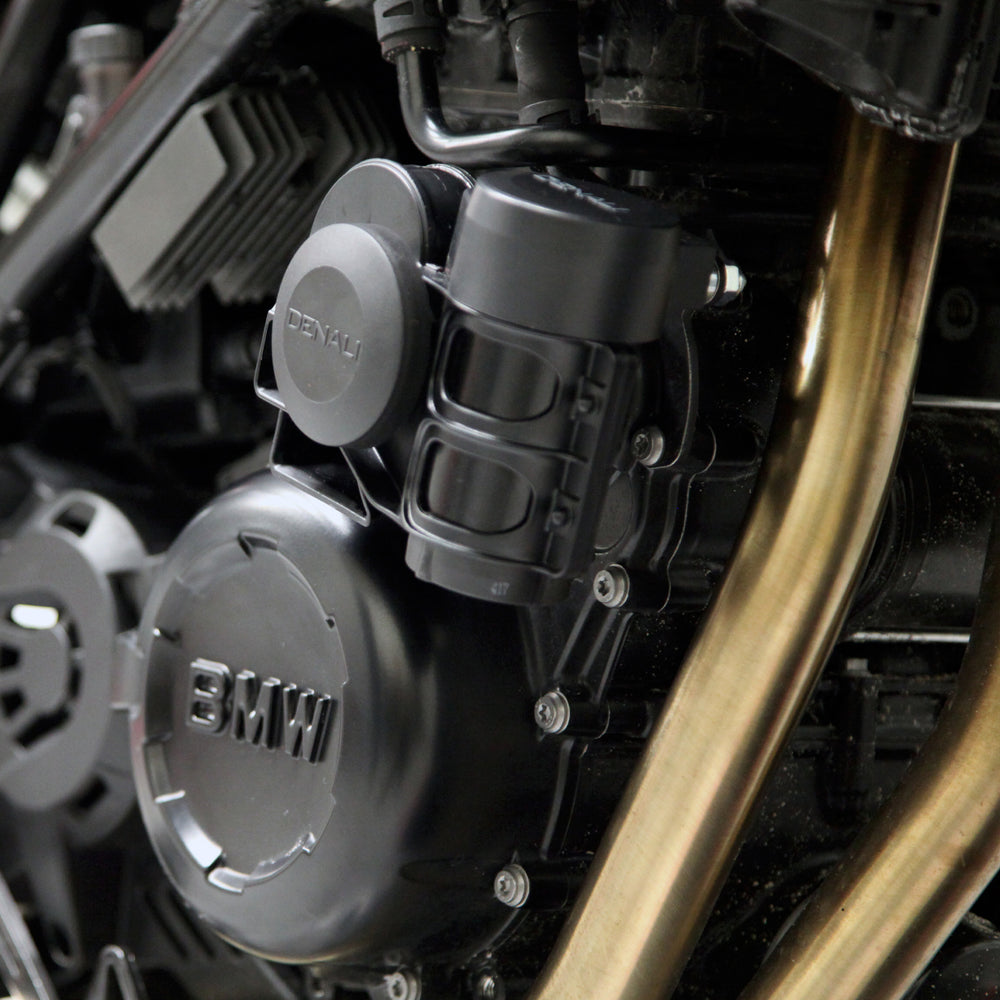
Plug & Play Installation
Quickly and easily connect high power aftermarket horns like our SoundBomb™ without having to add an additional harness or relay.
Strobe with Horn
With this feature selected the CANsmart™ will automatically strobe your passing lamps or auxiliary lights when you sound your horn. This feature works whether you have the factory horn or SoundBomb™ horn installed.
Brake Light Features
Deceleration Activated "Smart Brake" Technology
The CANsmart™ reads vehicle speed in real time to activate your auxiliary brake light during deceleration before you even touch the brake. You can adjust the sensitivity and minimum speed at which the Smart Brake Feature will activate.
Flash Pattern Braking
The CANsmart™ provides four different flash patterns that make our super bright auxiliary brake lights even noticeable to motorists behind you. You can set auxiliary brake lights to only flash under hard braking, flash continuously as your brake is applied or flash four times rapidly then hold steady (California legal flash rate).
Other Accessory Features
Switched Power Source
The CANsmart™ provides a universal "accessory" option which simply gives you clean switched 12V power. That means whatever accessory you connect to this circuit will turn on and off with your ignition.
Delay Time Out
You can also set the accessories on this circuit to have a delayed time out. This will keep them powered for up to 30 seconds after your turn off your bike.
On Board Power
This "accessory" circuit option is ideal for powering your GPS, phone, heated gear or any other electronic device.

True Plug & Play Installation
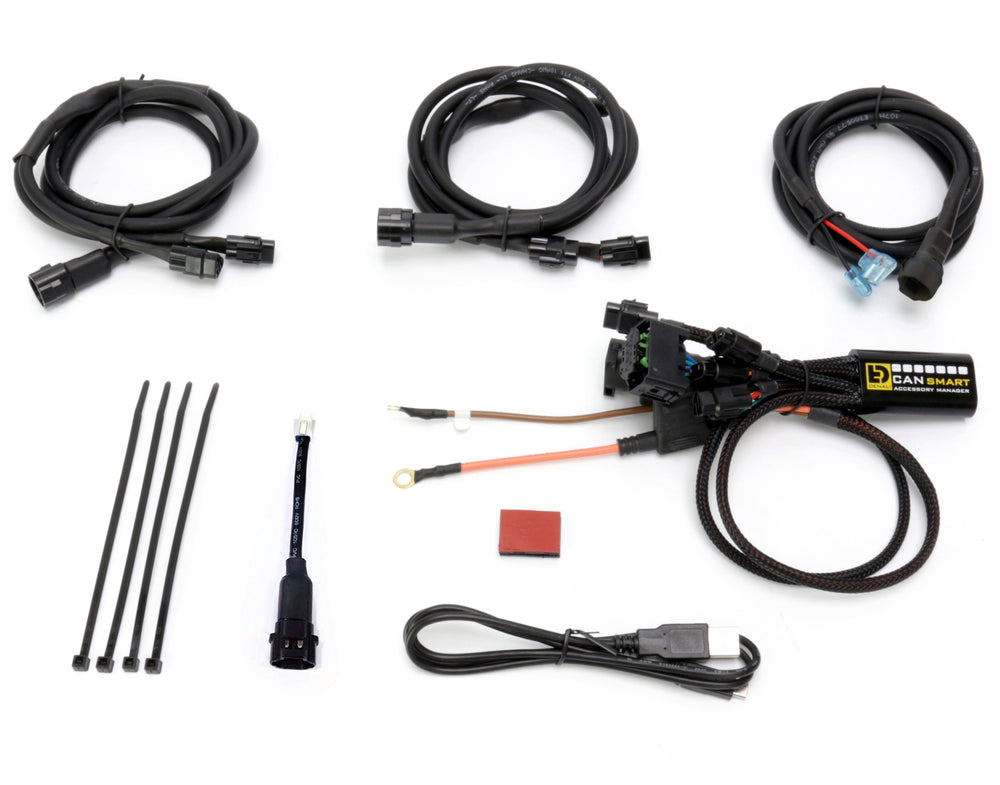
DENALI Accessory Harnesses Included
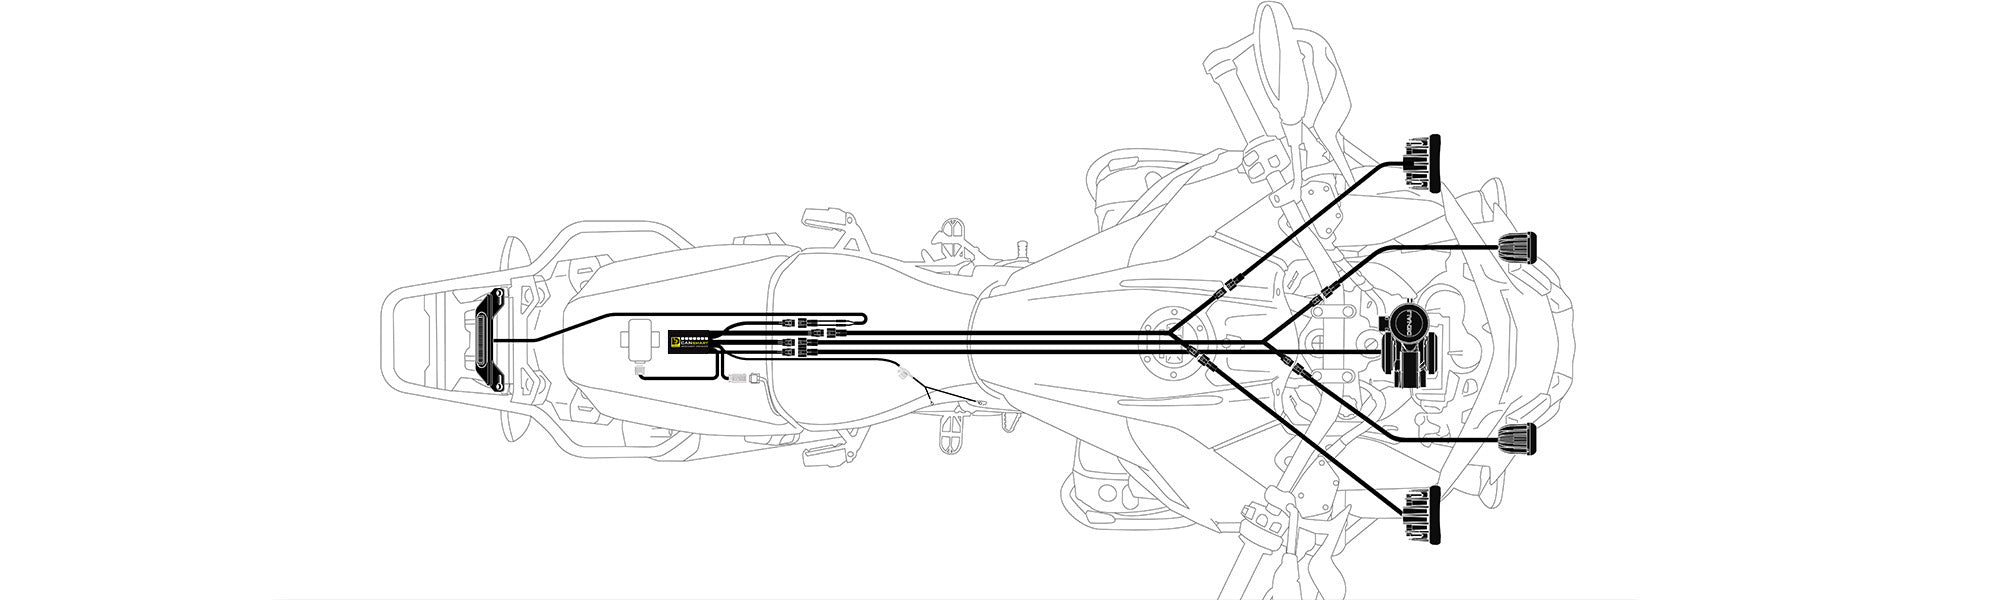
In addition to the CANsmart™ controller, our kit includes four additional wiring harnesses that enable plug & play connection of two sets of auxiliary lights, SoundBomb™ horns and auxiliary brake lights.
Compatible with 30 BMW Models
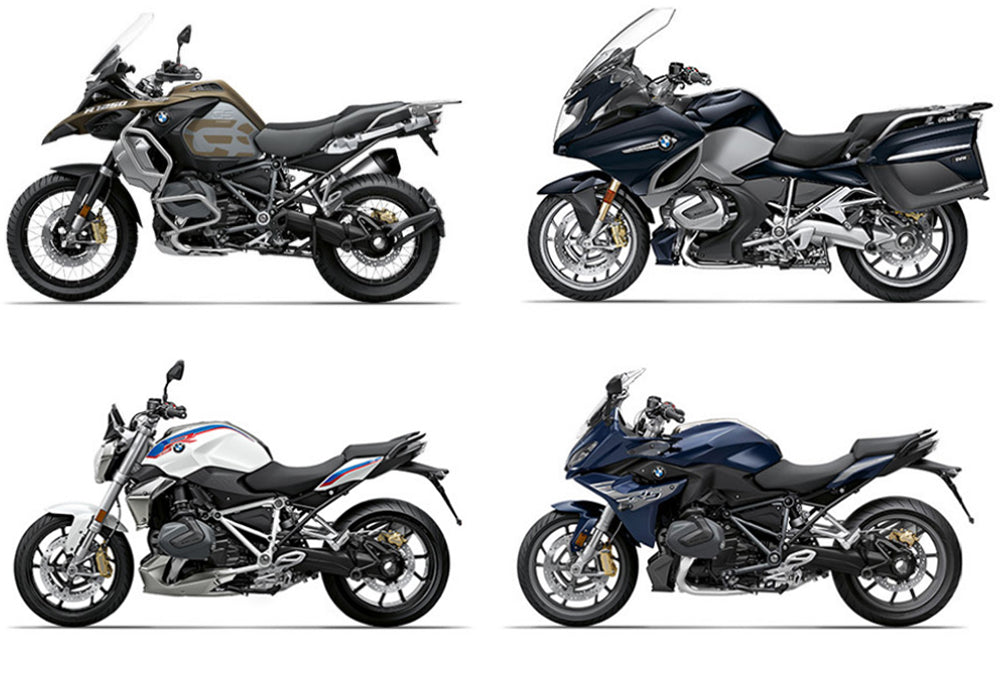
Our 4 BMW CANsmart™ variants are compatible with 30 BMW models. Use our shop by vehicle tool to find the correct part number for your BMW. Compatible models include:
K1600 GT/GTL/B/GA (2011-2020)
R1200 & R1250 GS/GSA (2004-2020)
R1200 & R1250 R/RS/RT (2005-2020)
S100XR (2015-2019)
F800 & F850 GS/GSA (2008-2020)
F800 R/S/GT/ST (2006-2018)
F700 & F750 GS (2013-2020)
F650 GS TWIN (2008-2012)

CANsmart™ User Guide // BMW
This online user guide is designed to provide additional information and support to be used alongside the physical user manual that is included with your CANsmart. If you have any questions don't hesitate to call our tech support line at 401 360 2550.
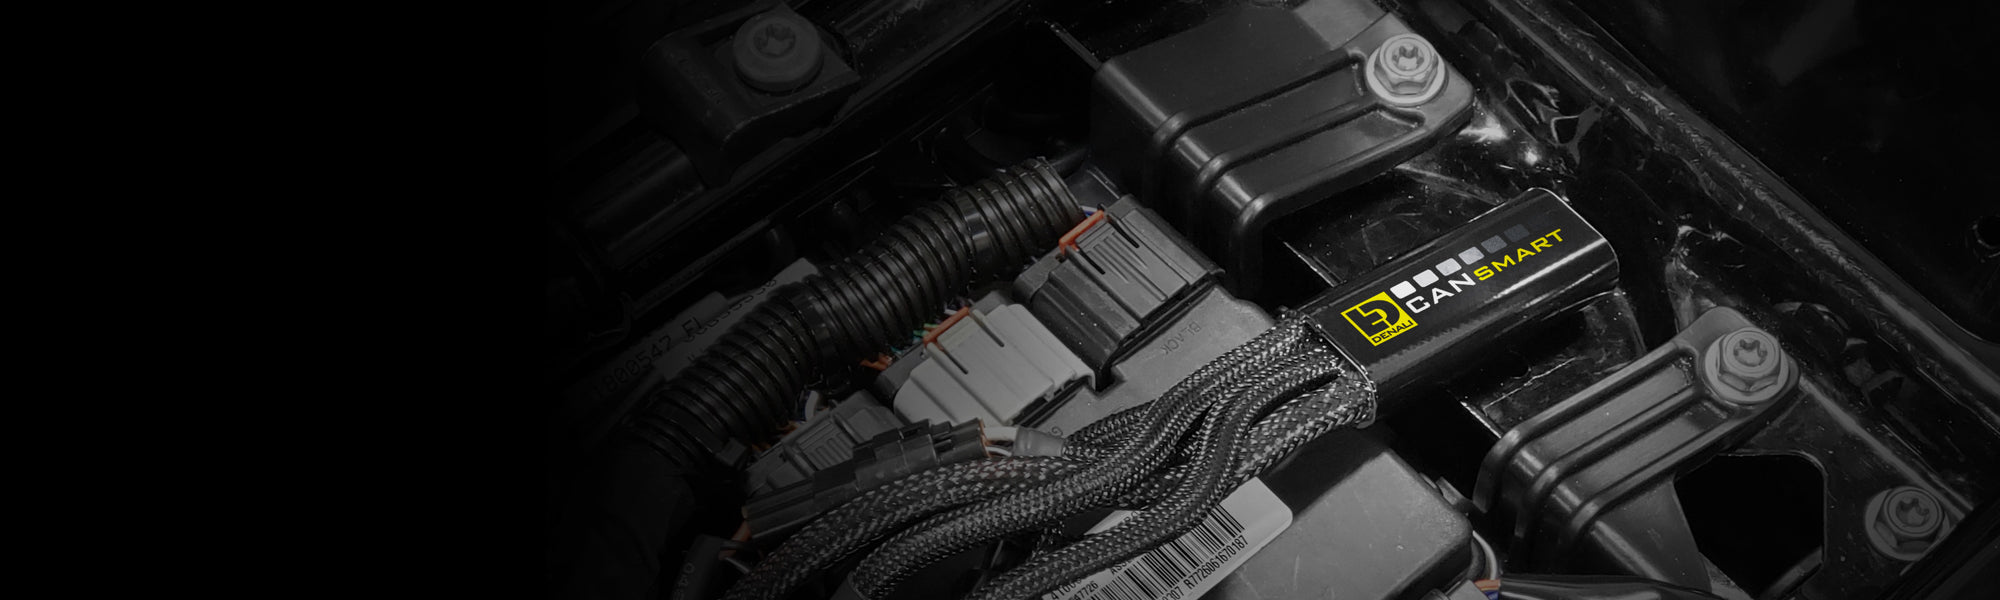
Device Overview
Familiarize yourself with the CANsmart unit, the four outputs (or circuits) and the included plug-&-play wiring adapters so you can plan your accessory installations.
Installation Guide
See just how easy it is to install a CANsmart™ Controller, connect accessories and change settings via the Accessory Manager Software.

Lighting Controls
A visual reminder showing how to independently turn on/off and dim two sets of auxiliary lights using the BMW WonderWheel and other original switches.
Troubleshooting Guide
With over 35 custom features and settings you might want a little extra help getting your CANsmart™ configured to your specific accessory setup.
Device Overview
Familiarize yourself with the CANsmart unit, the four outputs (or circuits) and the included plug-&-play wiring adapters so you can plan your accessory installations.

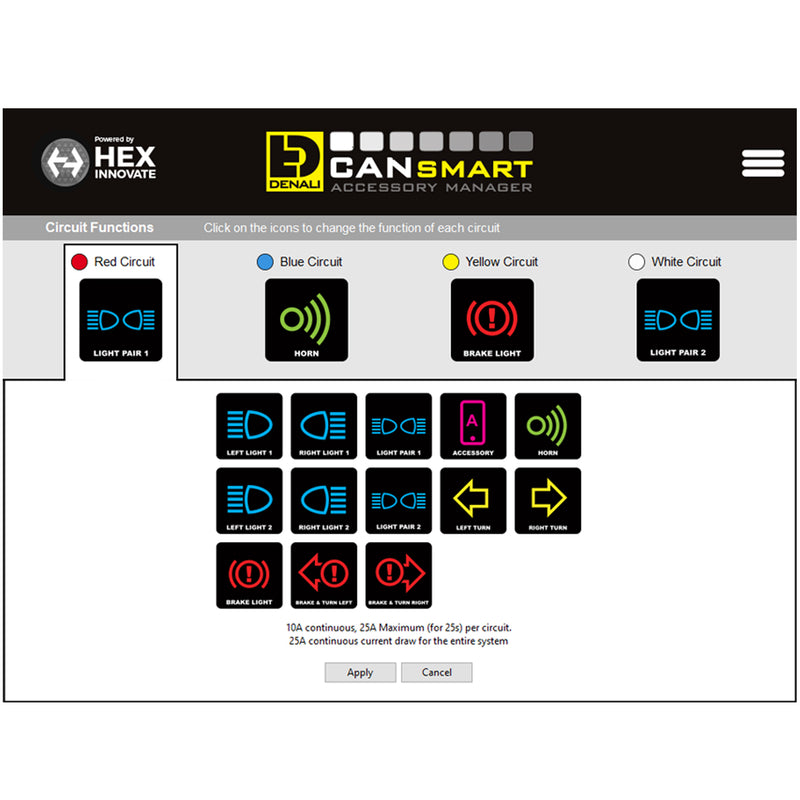
GEN II CANsmart Overview
Each of the four accessory circuits can be set to control any type of accessory. By default, the CANsmart controller is preprogrammed to control two sets of auxiliary lights, a brake light and a SoundBomb horn. Below are the default circuit settings.
Red Circuit: Light Pair One - Fuse: 10 Amps
Blue Circuit: Horn - Fuse: 25 Amps
Yellow Circuit: Brake Light - Fuse: 2 Amps
White Circuit: Light Pair Two - Fuse: 4 Amps
Installation Guide
This online installation guide provides supplemental information to be used alongside the physical user manual that is included with your CANsmart. Click on the links below to view the original PDF user manuals.
R1200 & R1250 LC Series
PDF User Manual // Rev01
R1200 Hex Series
PDF User Manual // Rev 01
K1600 & F850 Series
PDF User Manual // Rev 01
F800 & F700 Series
PDF User Manual // Rev 01
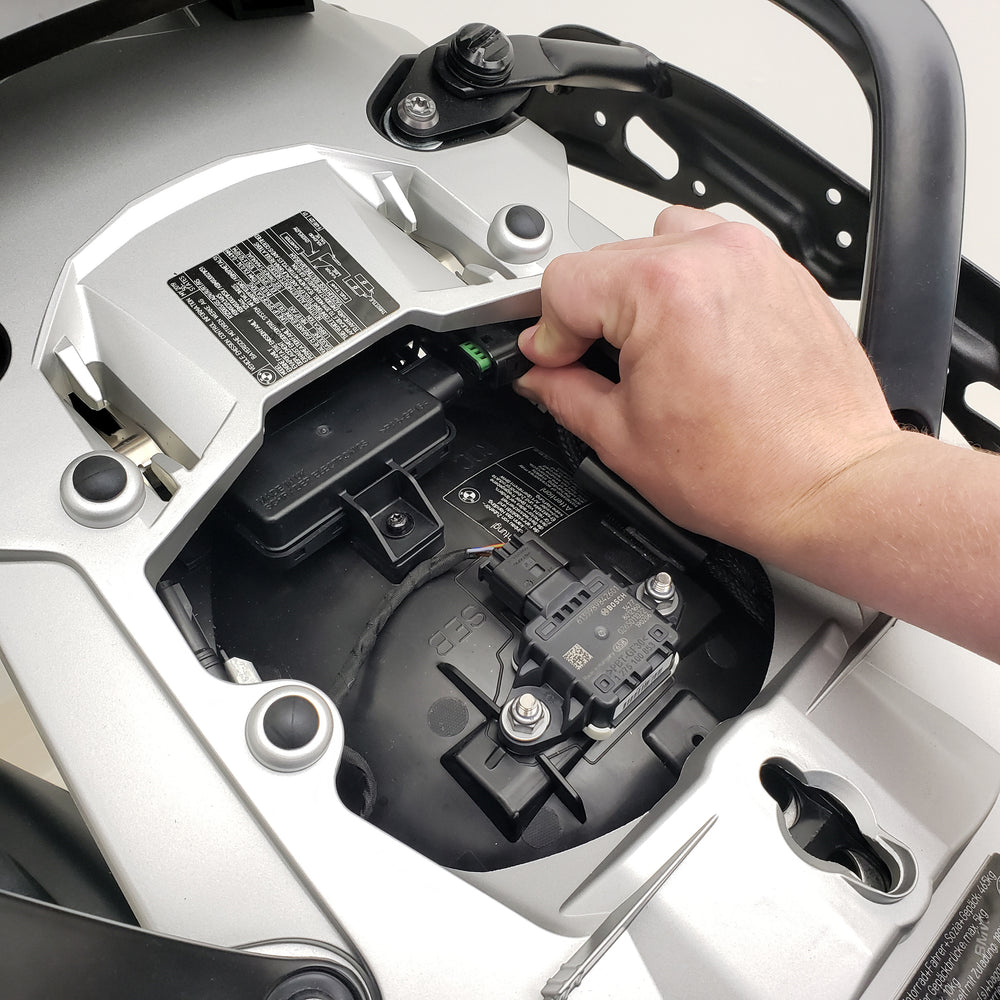
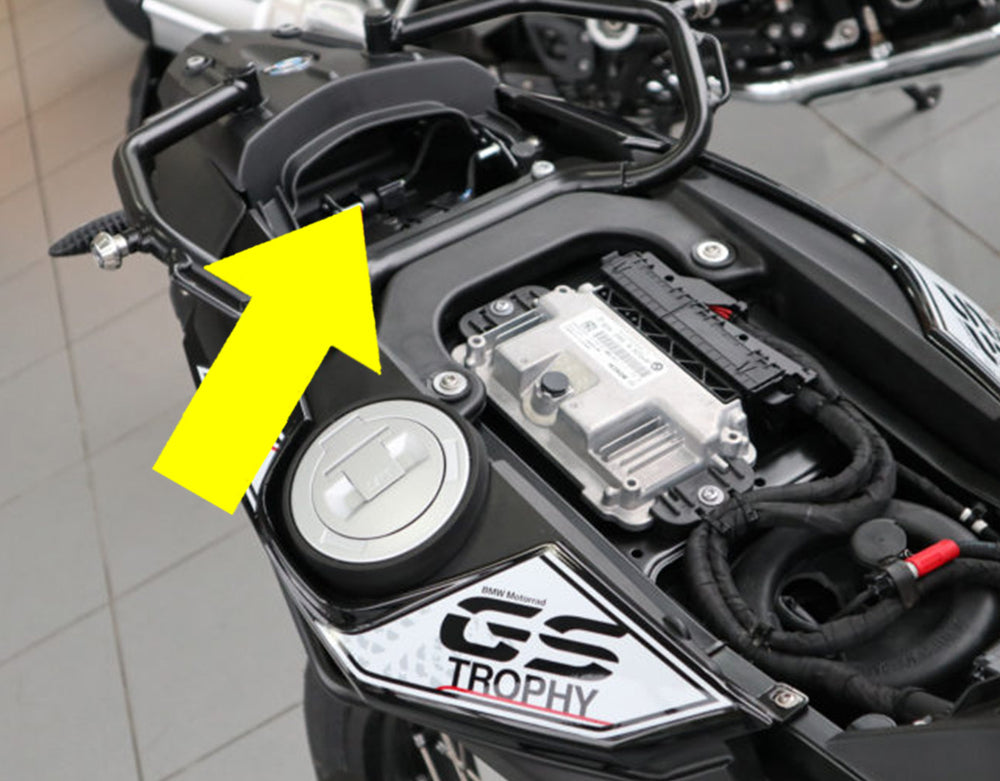
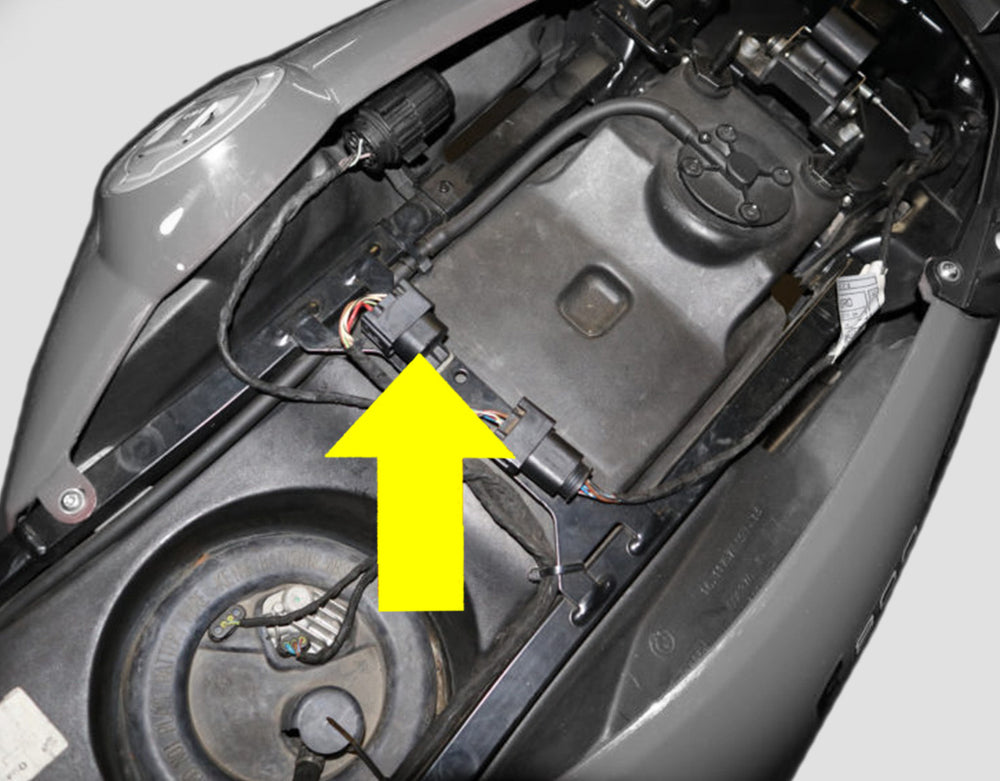
Step One: Connect to the CANbus
Plug the CANsmart unit into your bikes CANbus electrical system via a connector located under your seat. For R1200LC and R1250 models you connect to the Tire Pressure Monitor System (RDC). For all other BMW models you connect to the alarm system (DWA). Scroll down to see exactly which plug to connect to on your bike.
CANbus Connection Locations
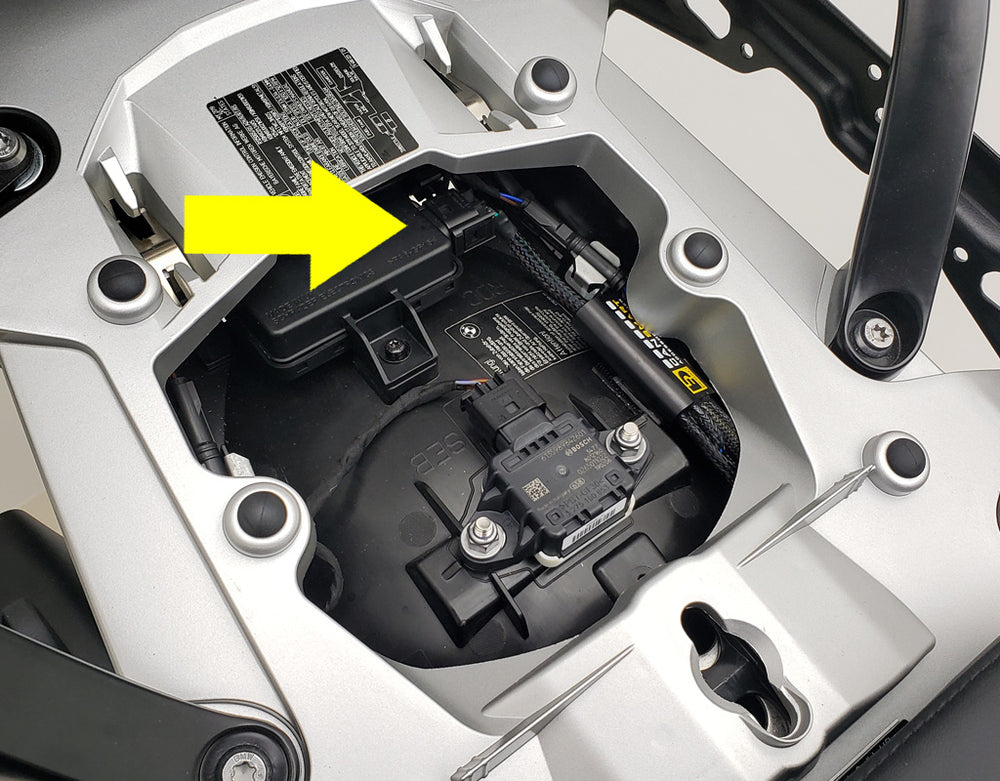
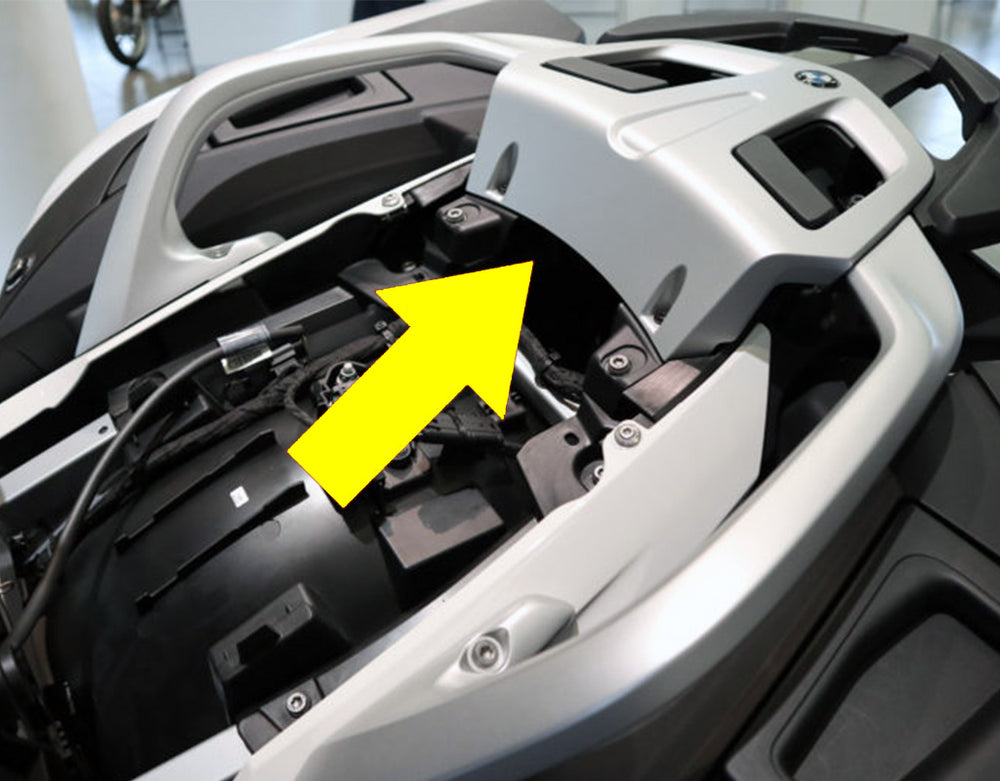
R1250 GS 2019-2020
Connect to the RDC connector located under the passenger seat at the rear of the opening.

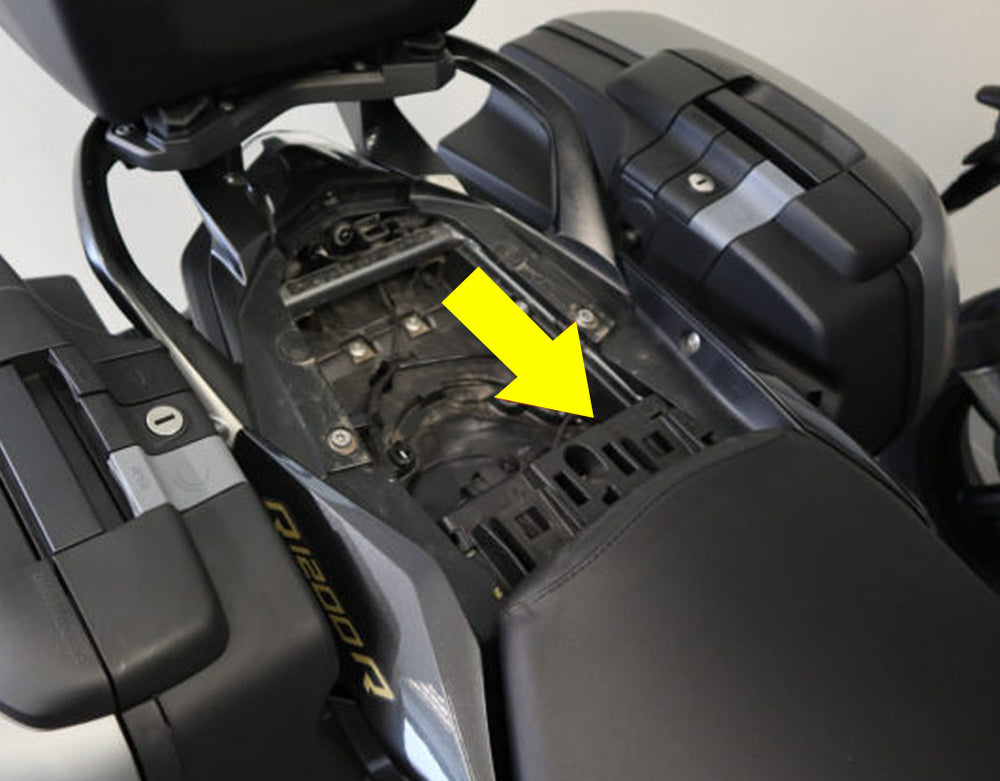
R1200 GS 2013-2018
Connect to the RDC connector located under the passenger seat at the rear of the opening.
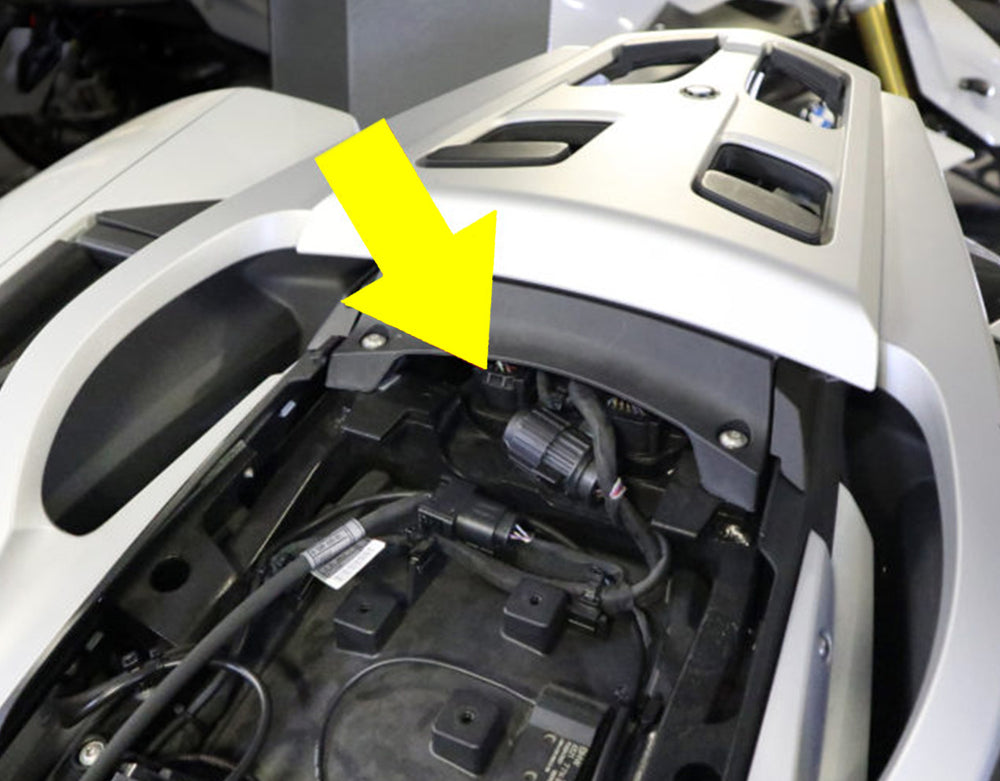
R1200 RT 2014-2018
Connect to the DWA connector located under the passenger seat at the rear of the opening.
R1200 R/RS 2015-2018
Connect to the DWA connector located under the passenger seat at the front left of the opening.
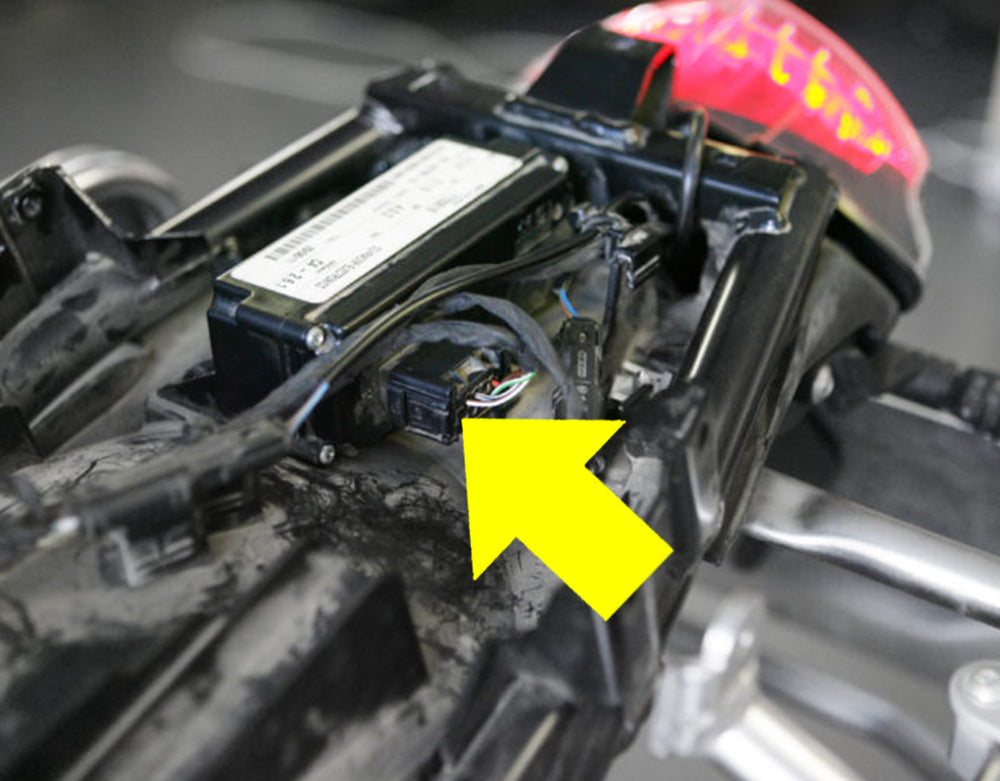
R1200 GS 2004-2012
Connect to the DWA connector located at the rear of the bike under the rear rack.
K1600 ALL 2011-2019
Connect to the DWA connector located under the passenger seat to the rear-left of the opening.
F700/800 GS 2008-2018
Connect to the DWA connector located under the passenger seat at the rear of the opening.
F800 S 2006-2010
Connect to the DWA connector located under the passenger seat on the right side.

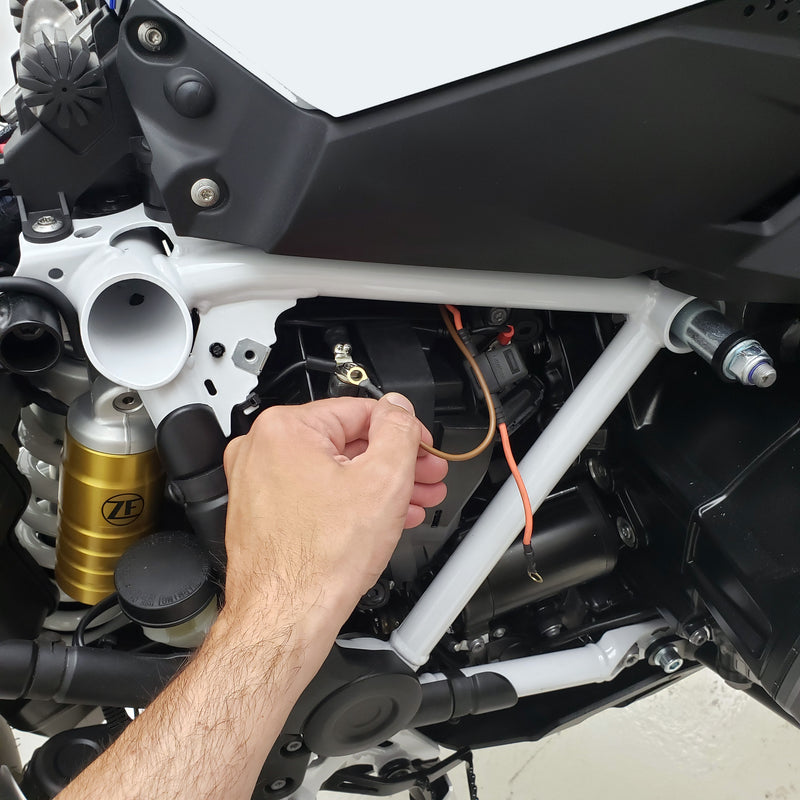
Step Two: Connect to the Battery
Route the orange and brown power lead down to your battery box and connect the ring terminals directly to the battery.
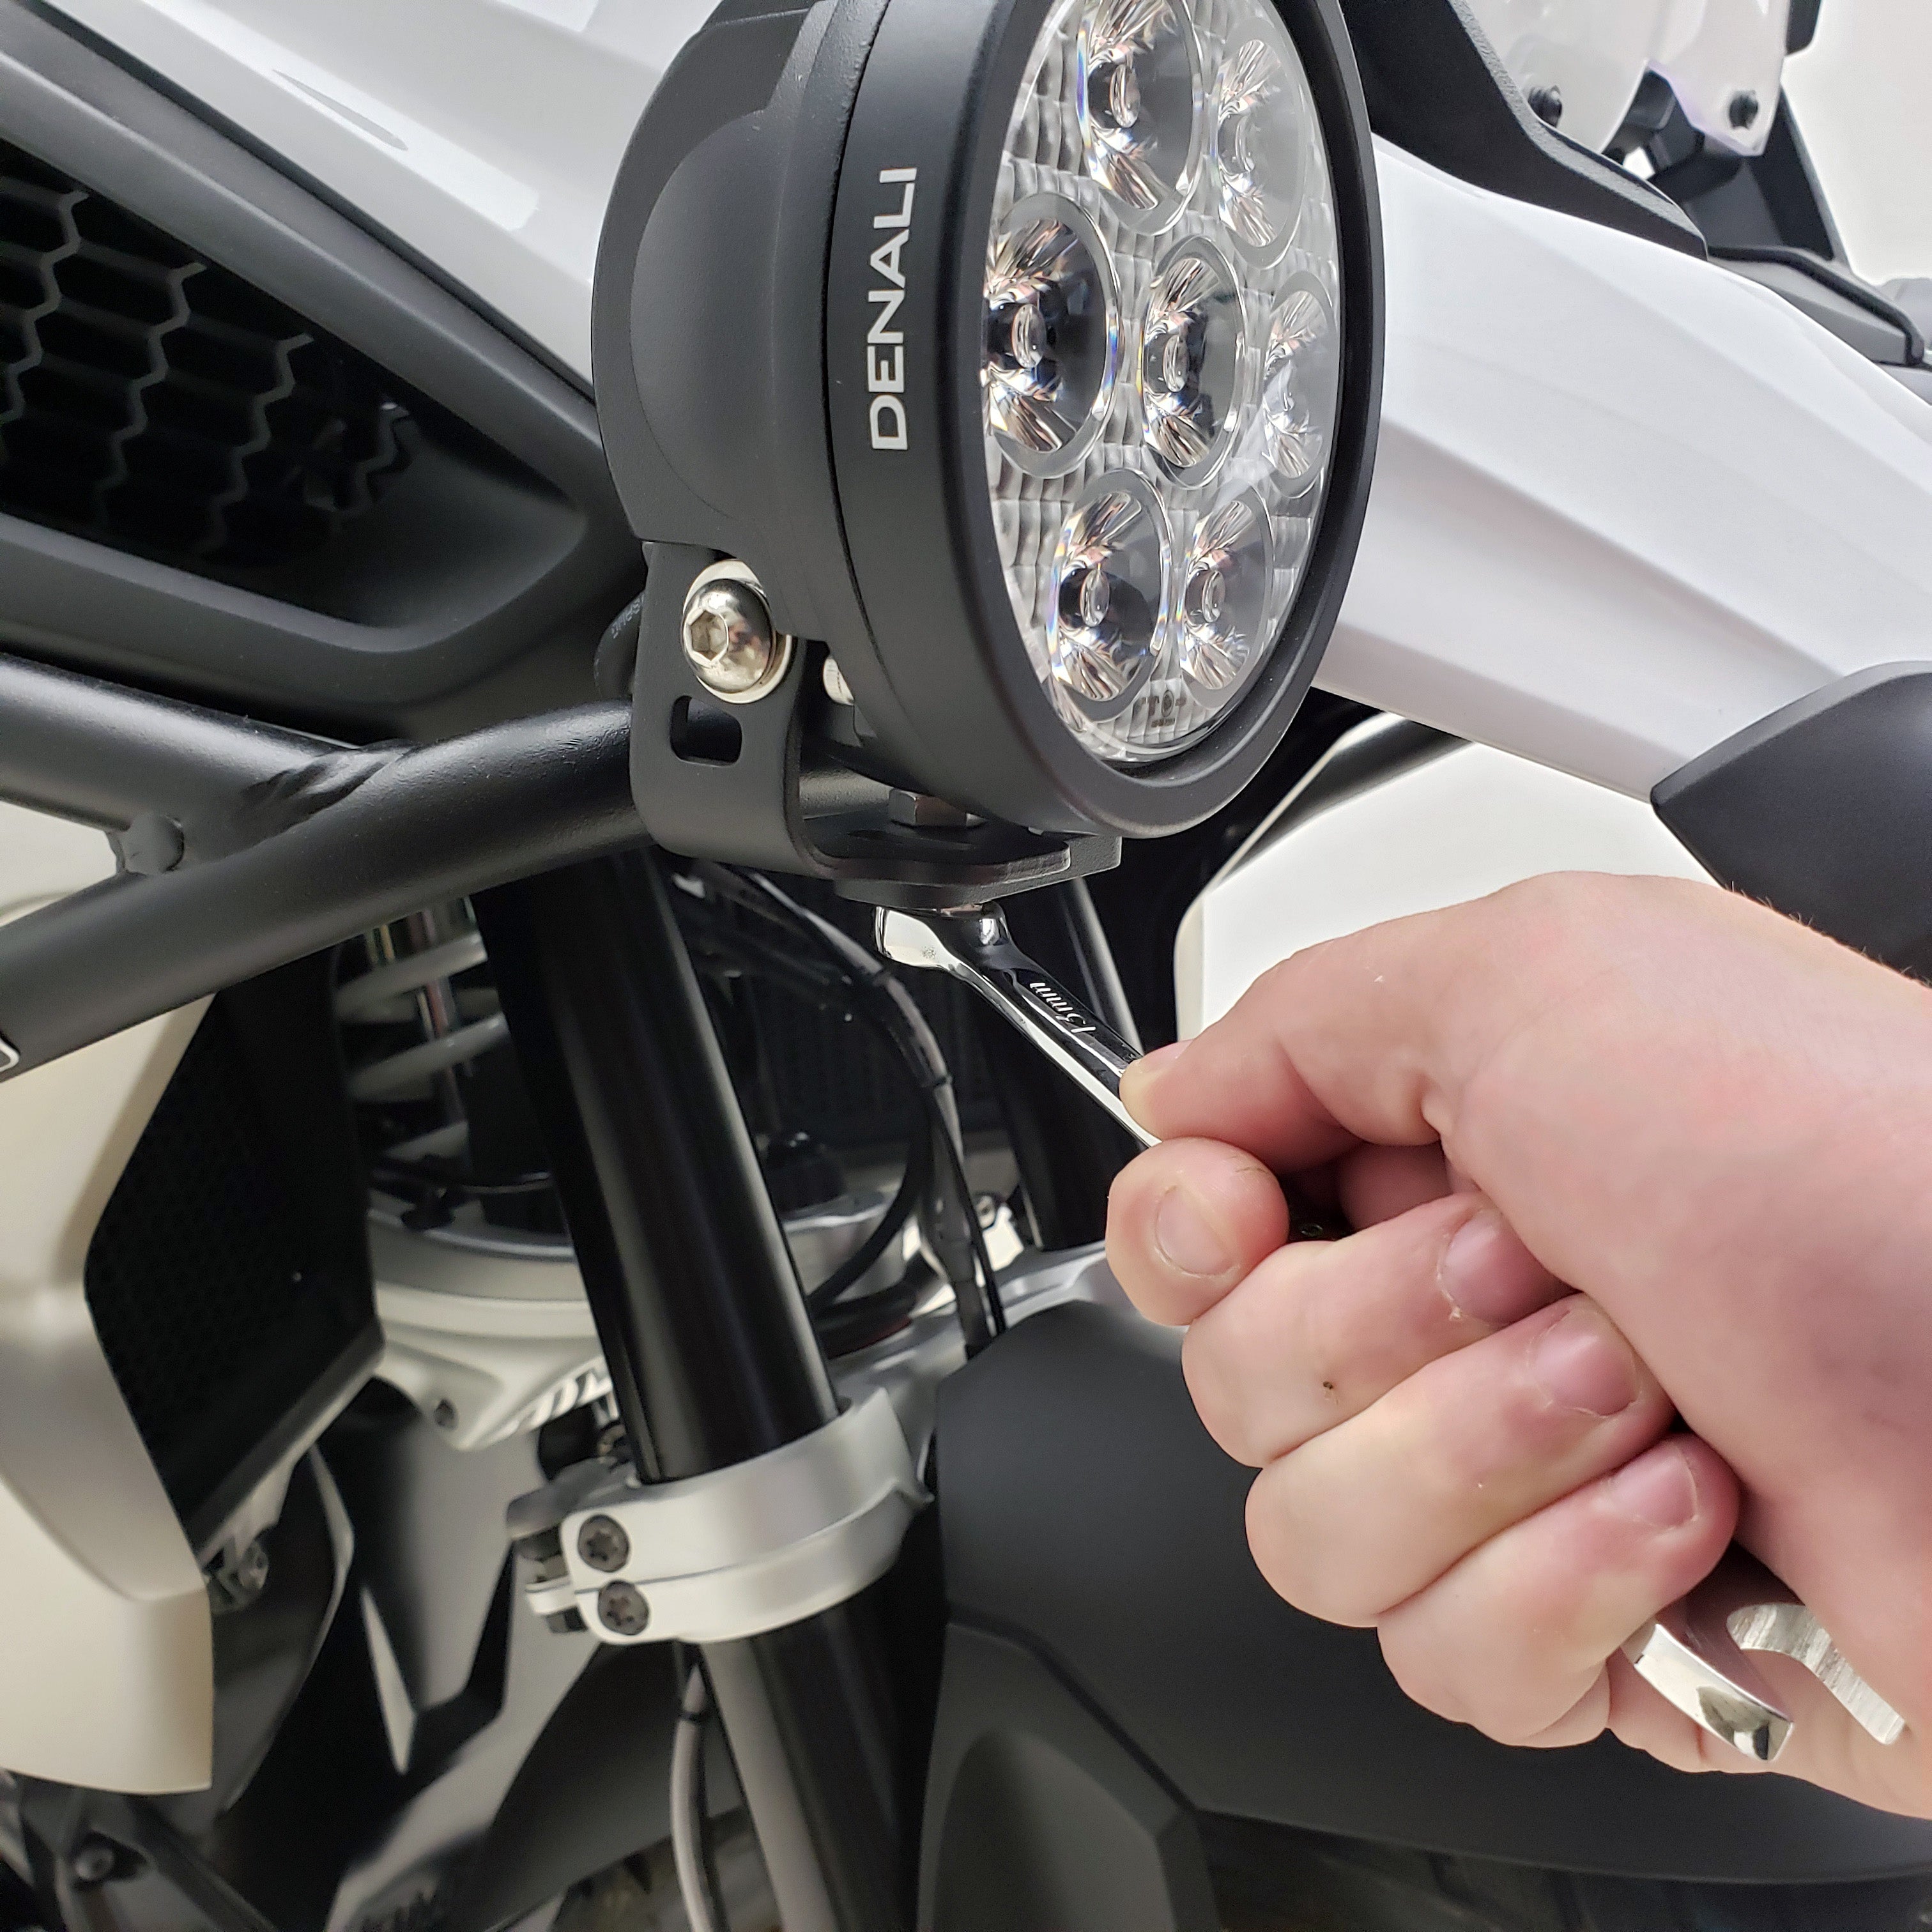
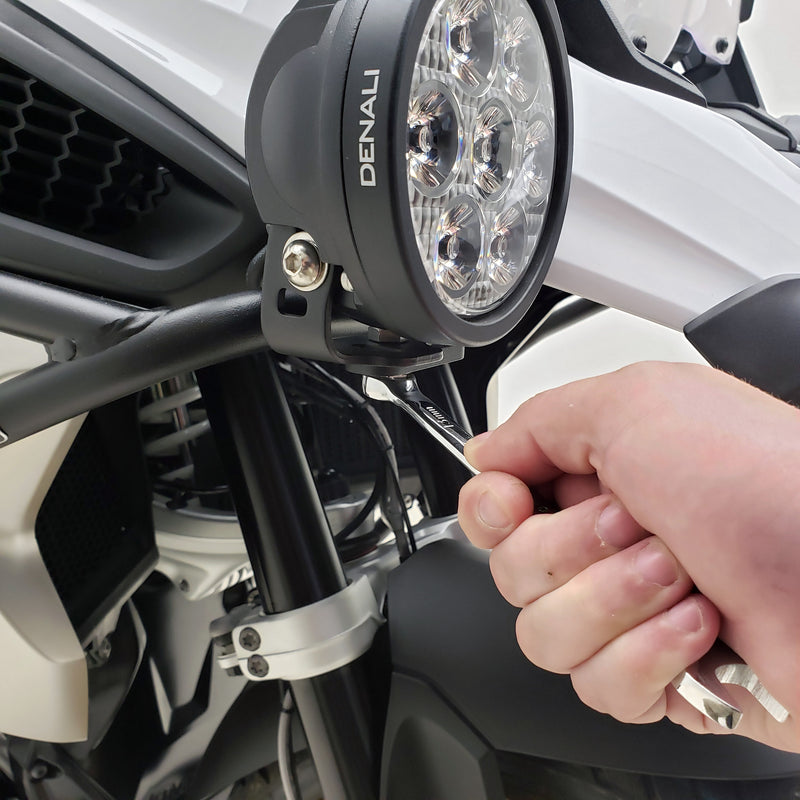
Step Three: Mount Your Accessories
Mount your auxiliary lights, horn, brake light and any other accessories that you plan to connect to the CANsmart.
Route and secure the wire leads from your accessories towards the CANsmart device located under the seat.
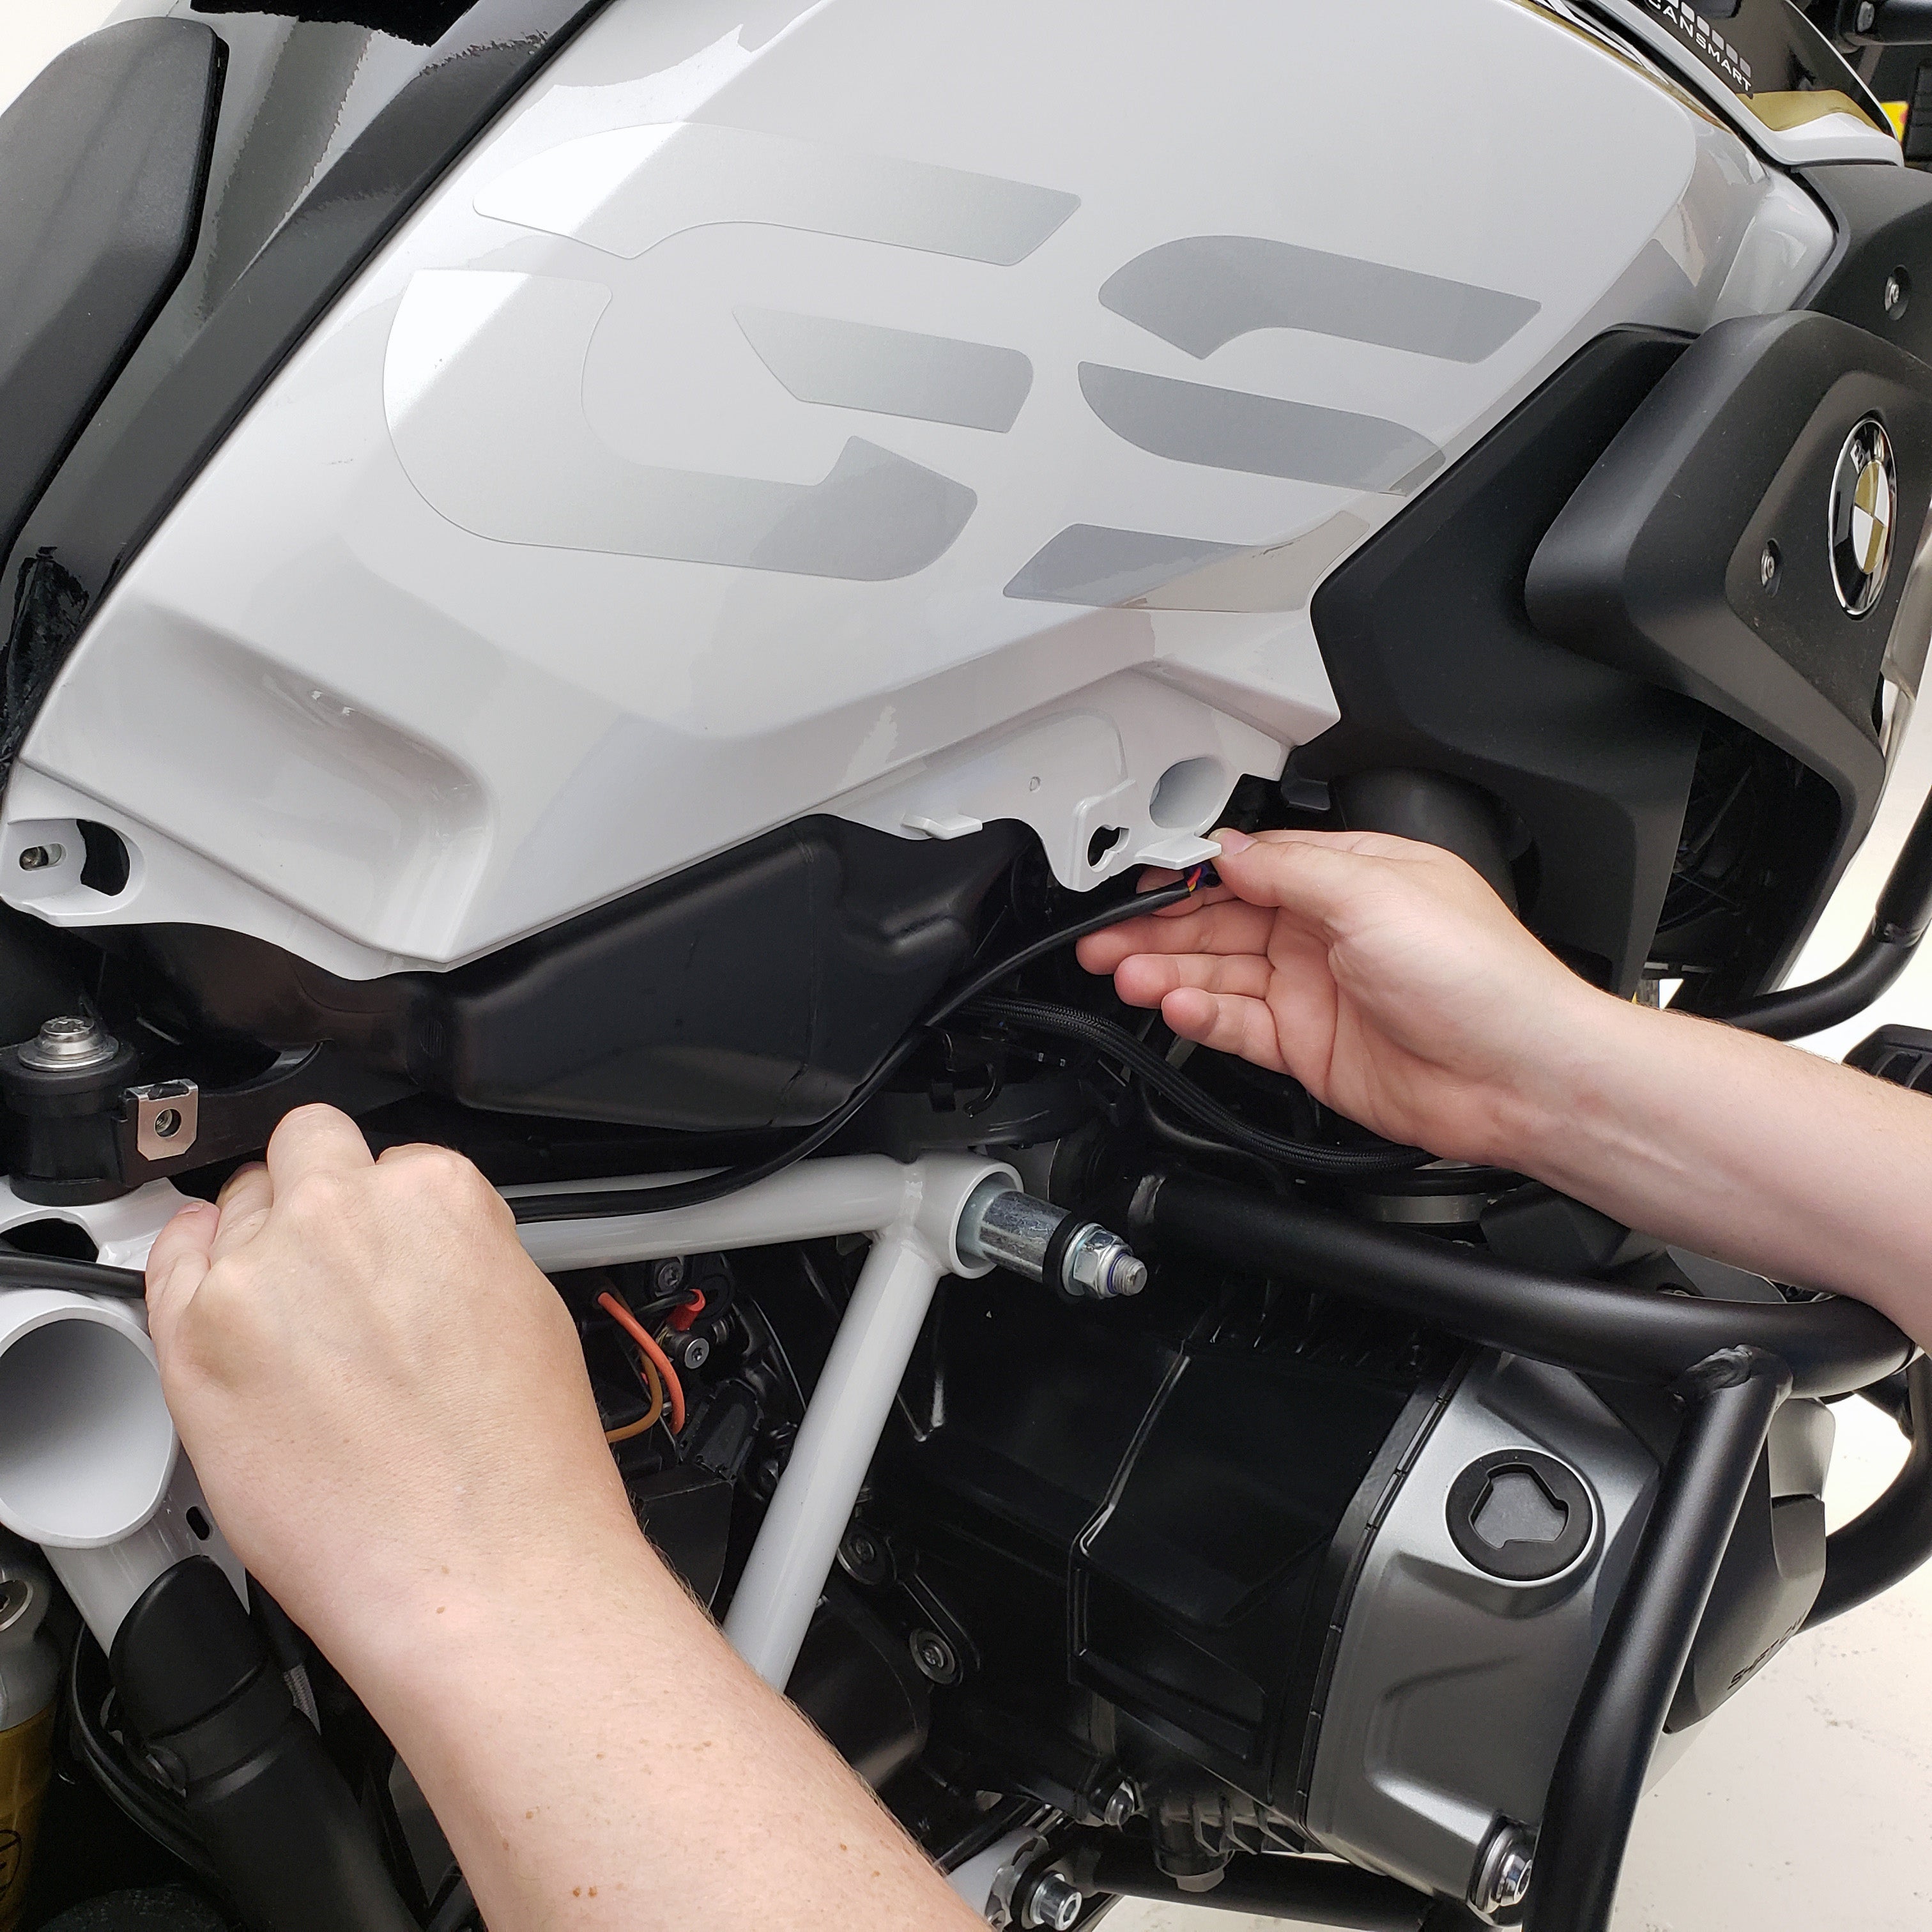

Step Four: Connect Your Accessories
Connect the included plug-&-play wiring adapters & extensions to the CANsmart and route them through the bike up to your installed accessories.
If you are installing DENALI Lights, a SOUNDBOMB horn or DENALI Brake Lights simply connect to the corresponding CANsmart circuit and there will be no programming necessary. All accessory features will be active and you are ready to ride!

Optional Step Five: Customize Settings
If you would like to change any of the circuit fuse values, turn off or adjust the default features, or power other 3rd party accessories you can download the Accessory Manager Software and connect your CANsmart device to your computer.
From there you easily set each of the four circuits to function as one of the customizable accessory types. Click on the link below to see the default features and settings along with all other available software functions and settings.
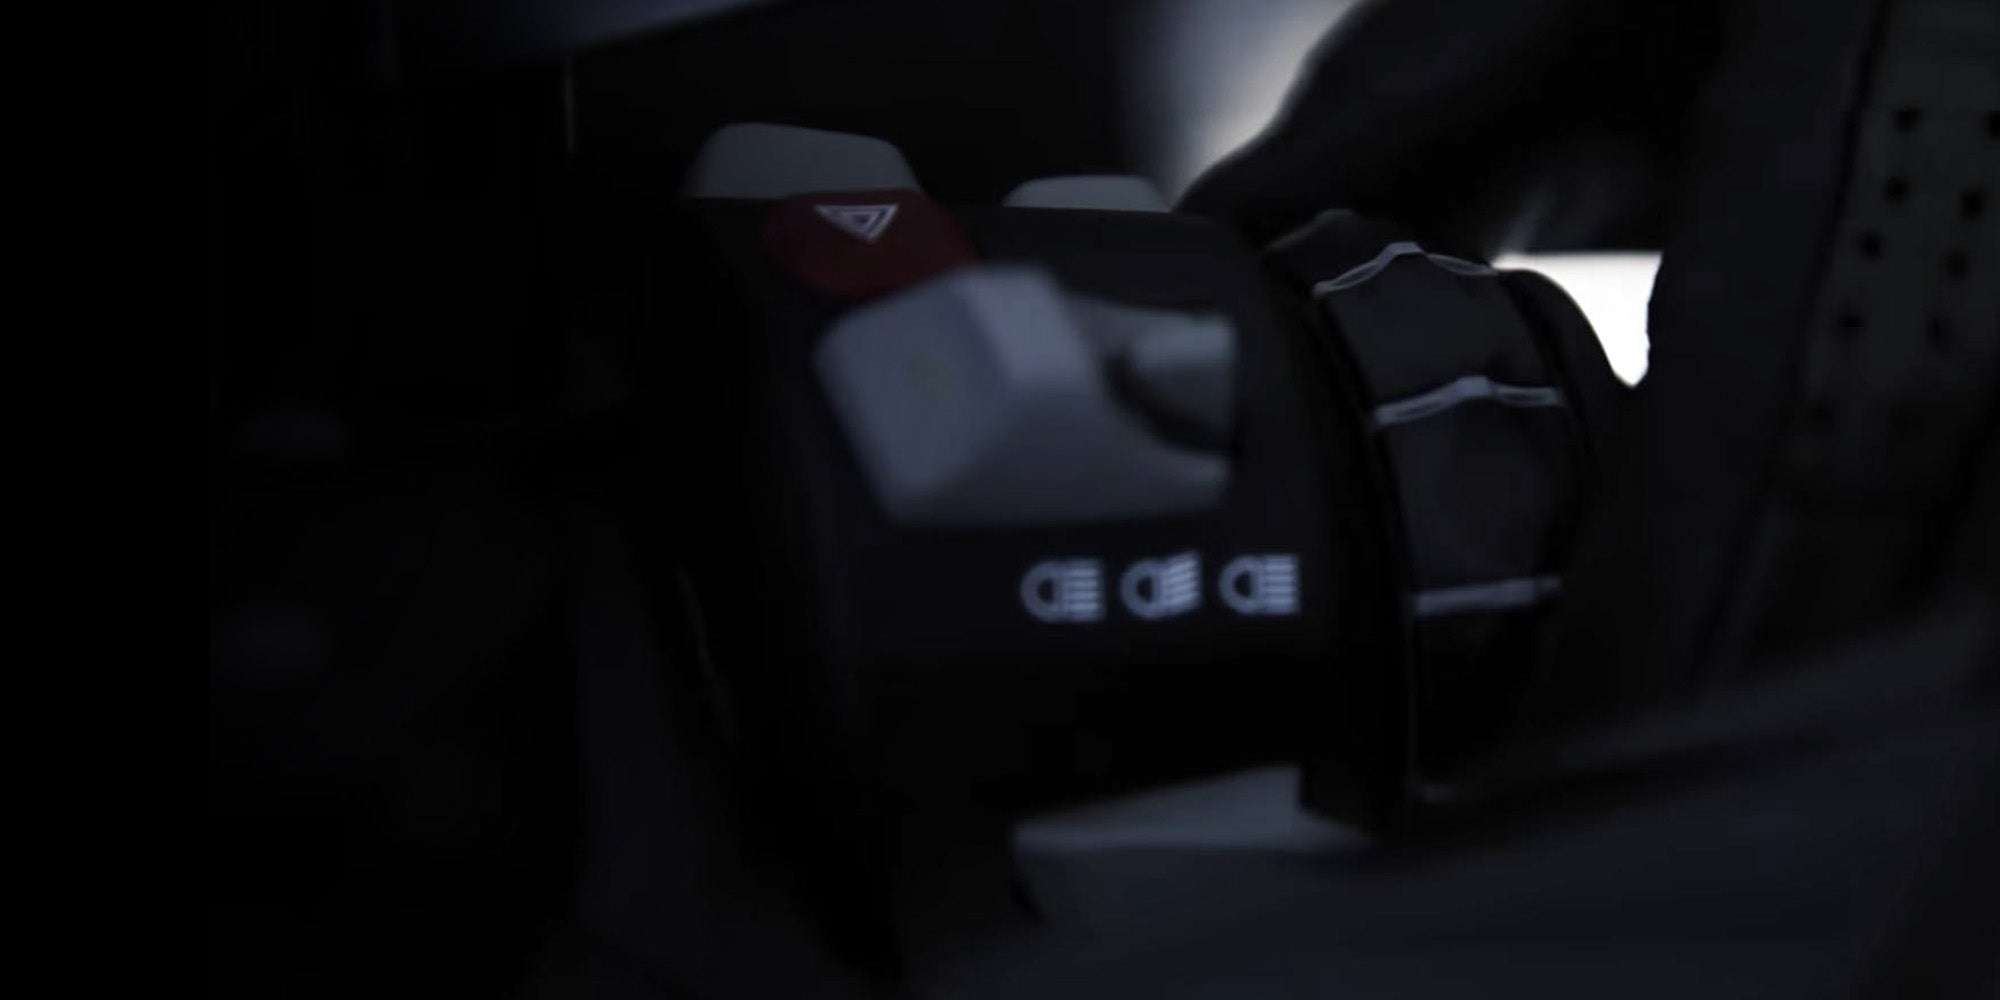
Lighting Controls
Controlling auxiliary lights from your vehicles original switches is the hallmark feature of our CANsmart system. Use the guide below to remind yourself how to independently turn on/off and dim two sets of auxiliary lights.
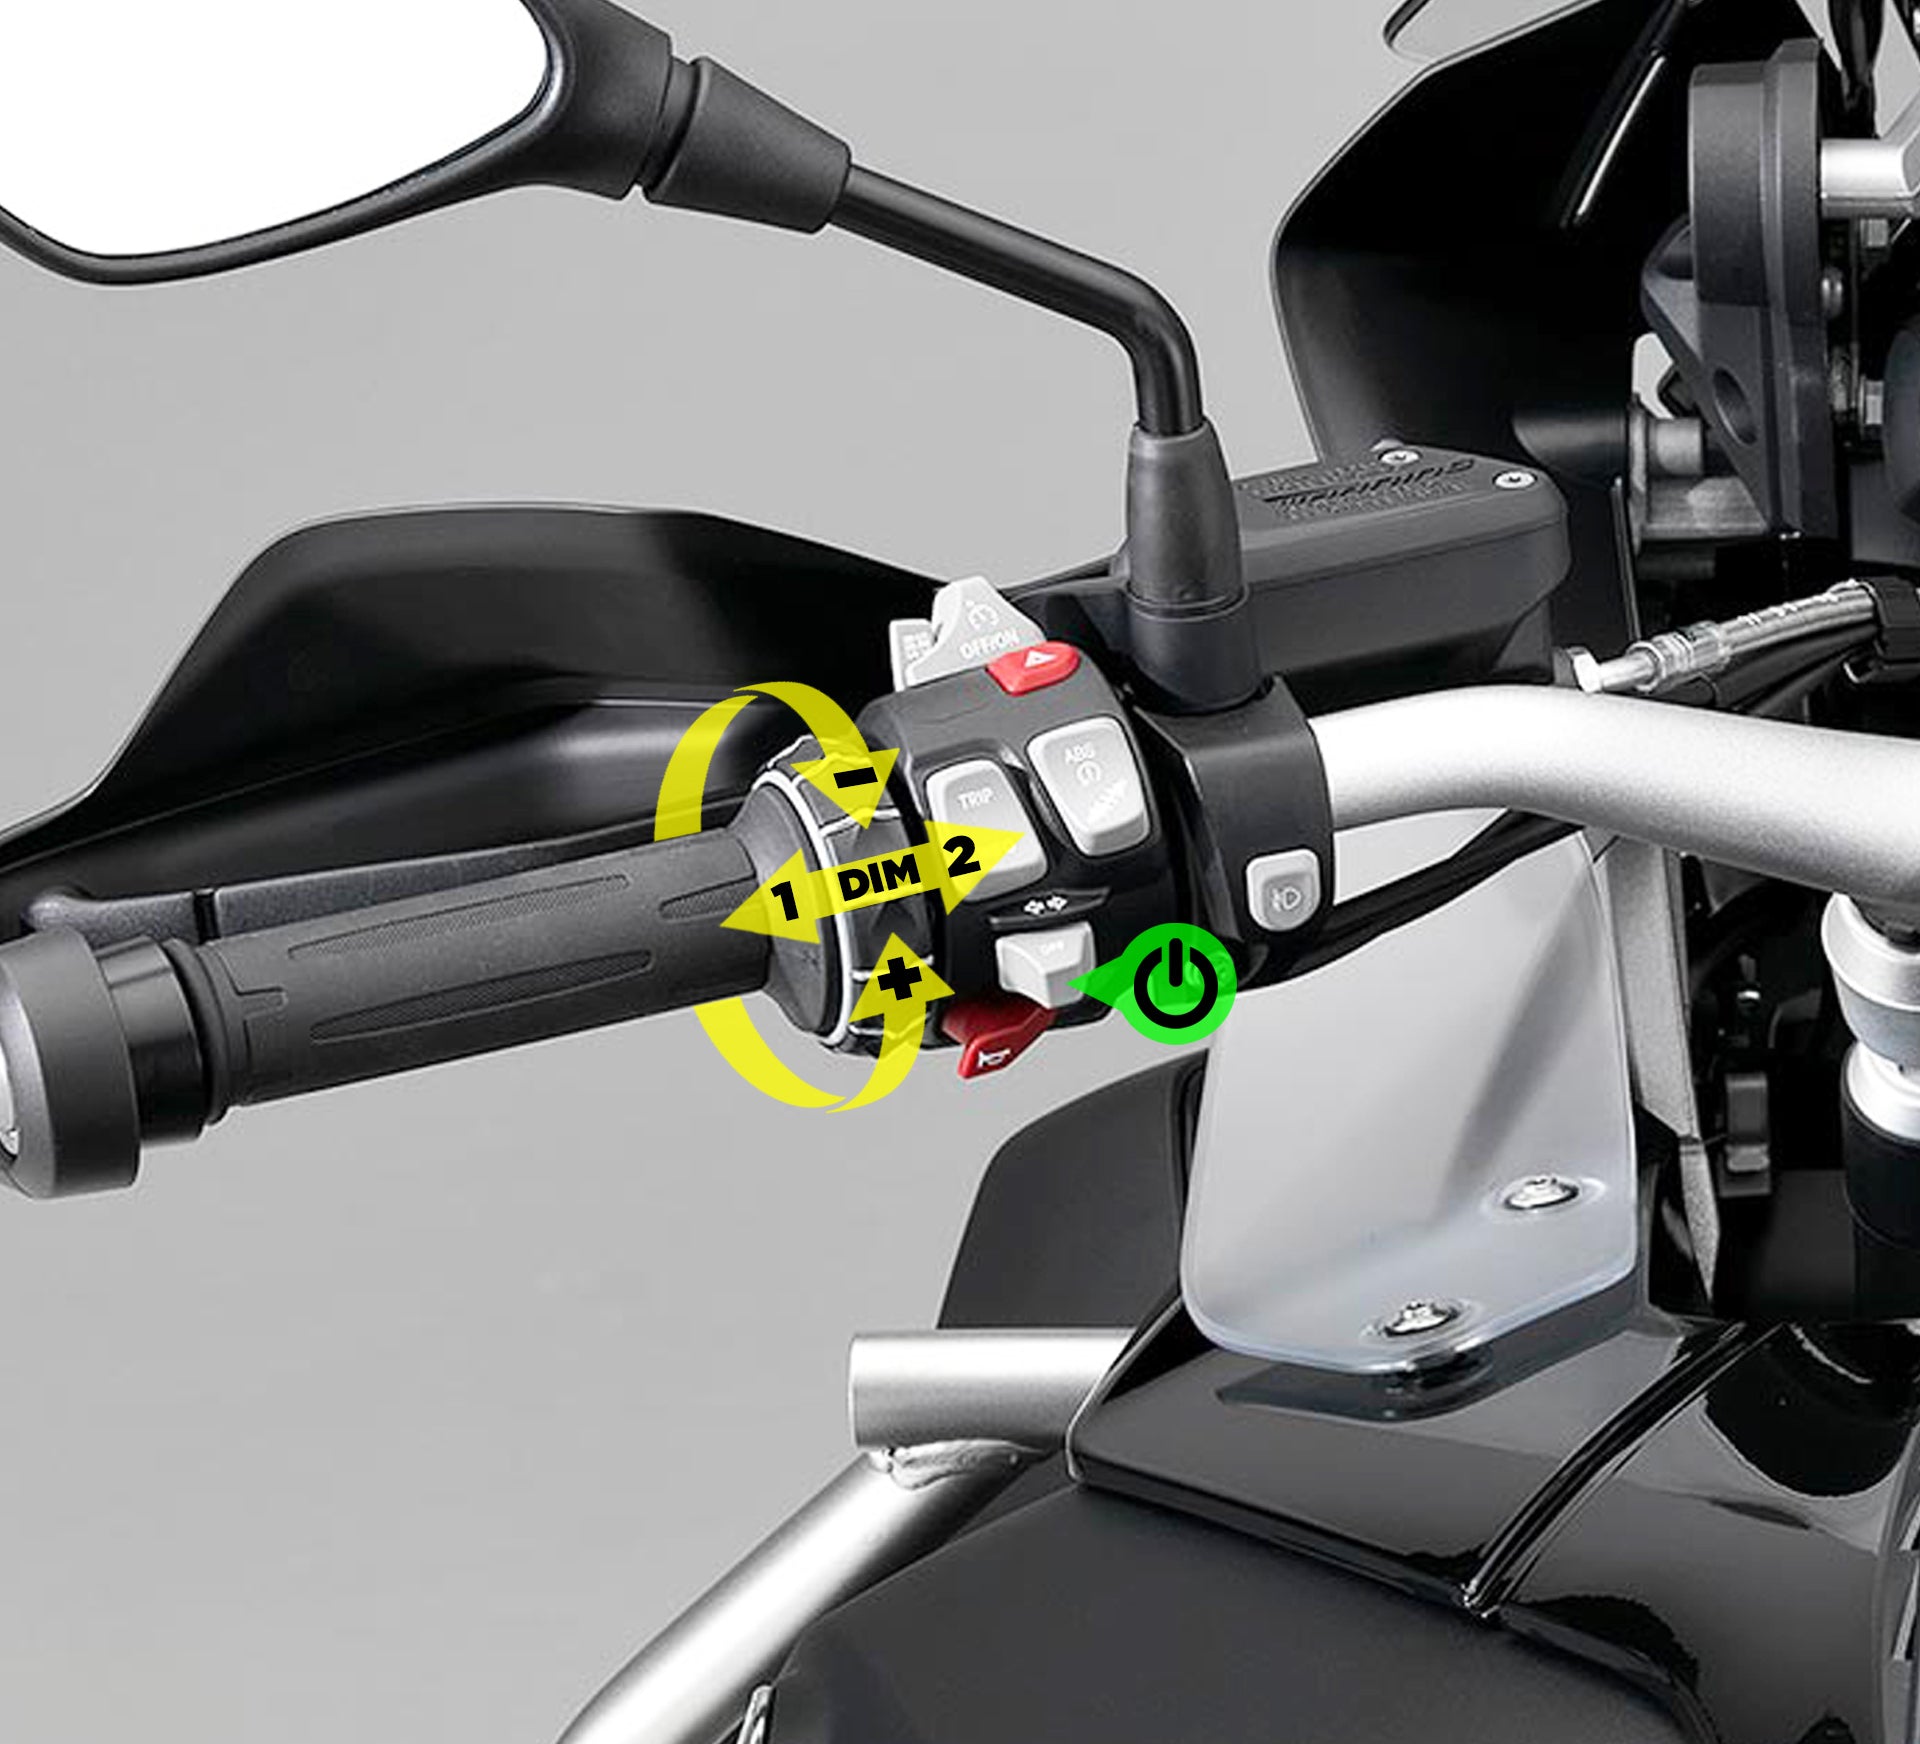

BMWs with WonderWheel
Turn On/Off - Light Set One
Hold the turn signal cancel button for 3 seconds
Dim - Light Set One
Hold the WonderWheel left until lights flash (3 seconds) to enter "dim mode"
Scroll up or down to change light intensity
Turn On/Off - Light Set Two
Tap the turn signal cancel button 3 times fast
Dim - Light Set Two
Hold the WonderWheel right until lights flash (3 seconds) to enter "dim mode"
Scroll up or down to change light intensity

Troubleshooting Guide
Below are some of the most frequently asked questions we get from folks who are looking for a little extra help getting their CANsmart installed and configured. If you don't see your question addressed here don't hesitate to call our tech support line at 401.360.2550.
CAN bus = “Controller Area Network” This is the computer system used by BMW and many other modern vehicle manufacturers, its essentially the brain of the vehicle. By connecting to the CAN bus and picking up data (messages from the vehicle's computer) we can use the vehicles controls and sensors to tell the CANsmart™ how to operate.
RDC = RDC is the German Language acronym for the Tire Pressure Monitor System.
DWA = DWA is the German Language acronym for the vehicle anti-theft alarm system.
Circuit = The output channels of the CANsmart™, there are four circuits, Light Circuit 1, Light Circuit 2, Horn Circuit and Brake Light Circuit.
Accessory Manager Software = The PC or Mac software used to configure the settings of the CANsmart™.
LED Indicator Light = The small LED indicator located next the Micro USB port on the CANsmart Device.
Three-Wire Lights = Lights that feature a 3rd dedicated dimming wire in addition to the power and ground wires.
Two-Wire Lights = Lights that only have a power and ground wires and do NOT have a dedicated dimming wire.
Info Button = The button which cycles between the different info on the dash (Odometer, Trip 1, Trip 2, etc.). Also known as the “Trip Button” or “Trip Switch”.
TSC = “Turn Signal Cancel” button, located on the left side of handlebar.
WonderWheel = BMW scroll wheel which controls the factory info panel, located on the left side of handlebar
On GEN II CANsmarts, each of the four accessory circuits can be set to control any type of accessory. By default, the CANsmart controller is preprogrammed to control two sets of auxiliary lights, a brake light and a SoundBomb horn. Below are the default circuit settings.
Red Circuit: Light Pair One - Fuse: 10 Amps
Blue Circuit: Horn - Fuse: 25 Amps
Yellow Circuit: Brake Light - Fuse: 2 Amps
White Circuit: Light Pair Two - Fuse: 4 Amps
If you would like to change any of the circuit fuse values, run different accessories, or turn on/off and adjust features you can download the Accessory Manager Software and connect your CANsmart device to your computer.
For R1200LC and R1250 models you connect to the Tire Pressure Monitor System (RDC) connector. For all other BMW models, you connect to the alarm system (DWA) connector. CLICK HERE to see exactly which plug to connect to on your bike.
1. Make sure you are plugged into the correct CANbus connector for your bike as there can be more than one connector to plug into under the seat. CLICK HERE to see exactly which plug to connect to on your bike.
2. Make sure the CANsmart is connected to the battery and confirm that the main fuse is not tripped.
3. Connect your device to the current version Accessory Manager Software to confirm that you have the latest firmware installed on your device. If your firmware is outdated, you will be prompted to update your device immediately upon connecting to the software.
1. Make sure you have the newest version of the CANsmart Accessory Manager Software installed on your computer.
2. Try a different USB port on your computer. The device works best when connected to a USB 2.0 or USB 3.0 port. Some computers use a combination of the older USB 1.1 and the newer 2.0 or 3.0 ports.
3. Check that the USB cable is not damaged, the Micro USB end of the cable is easy to bend or crush.
If your lights are connected but not turning on, or they are on, but you are unable to turn them off or dim them from the bike please check the following:
1. Make sure you are plugged into the correct CANbus connector for your bike as there can be more than one connector to plug into under the seat. CLICK HERE to see exactly which plug to connect to on your bike.
2. Make sure your lights are connected to one of the three-wire (red,black,yellow) light circuits.
3. The lights might be turned off. Use the TSC/Info Button to turn the auxiliary lights ON. CLICK HERE if you forget how to turn the lights on/off using your vehicle TSC/Trip switch.
4. Connect to the Accessory Manager Software or use the Wonder Wheel/Info Button to double check that Low Beam Intensity and/or High Beam Intensity are not set to 0%
5. Make sure the proper dimming mode has been selected in the Accessory Manager Software.
For Three-Wire Lights Disable“Two-Wire Dimming Mode”
For Two-Wire Lights Enable“Two-Wire Dimming Mode”
6. Check the LED indicator light on the CANsmart, if the indicator light is flashing red than a fuse has been tripped and value needs to be increased using the Accessory Manager Software.
7. Check that all harness connections and wiring to the auxiliary lights are solid and free of shorts.
8. It’s possible that the accessory is defective rather than the CANsmart. Be sure to bench test the accessory by powering it directly from the vehicles battery or an alternative 12v DC power source to insure the accessory functions standalone.
The Auxiliary Brake Light is not functioning?
1. Connect to the Accessory Manager Software to double check that the Running Light Intensity and/or Brake Light Intensity not set to 0%
2. Check the LED indicator light on the CANsmart, if the indicator light is flashing red than a fuse has been tripped and value needs to be increased using the Accessory Manager Software.
3. Check that all connections/wiring to the brake light are solid and free of shorts.
4. It’s possible that the accessory is defective rather than the CANsmart. Be sure to bench test the accessory by powering it directly from the vehicle’s battery or an alternative 12v DC power source to insure the accessory functions standalone.
5. It is possible that one of the wires in the B6 brake light wiring adapter (pigtail) has lost contact with the connector terminal. Use a voltmeter to confirm there is continuity from one end of the pigtail to the other. If not, DENALI will replace the wiring adapter free of charge.
The Brake Light’s “Auto-Flash (Declaration Activated Flashing)” feature is not functioning?
There is some confusion regarding the Auto-Flash feature and how it is supposed to function.
1. Auto-Flash only works above activates above 30mph (50km/h)
2. The sensitivity of the system can be adjusted in the extra settings window. The default deceleration rate at which the light will activate is 12.4mph/sec., changing this to "More Sensitive" changes the value to 11.8mph/sec..
3. If deceleration is due to active braking, the flashing will continue until both brakes are released. If deceleration is due to engine braking, the flashing will continue until deceleration is less than the deceleration threshold or vehicle speed is less than 30mph.
4. Auto brake flashing on tap-off will only flash if the deceleration is over the threshold, which is not typically long in these cases. The light will flash a minimum of two times if the deceleration goes over the threshold and the brake is not active. If the brake is active the light will continue to flash until the brake is released.
1. Check the LED indicator light on the CANsmart, if the indicator light is flashing red than a fuse has been tripped and value needs to be increased using the Accessory Manager Software.
2. Check that all connections/wiring to the horn are solid and free of shorts.
3. F800 Series & R1200 HexHead Series Only – Double check the green horn input wire, this wire must be connected from the CANsmart out to the factory horn for the aftermarket Horn to function.
4. It’s possible that the accessory is defective rather than the CANsmart. Be sure to bench test the accessory by powering it directly from the vehicle’s battery or an alternative 12v DC power source to insure the accessory functions standalone.
Solid Green = Normal operation (Vehicle Ignition ON)
Slow Flashing Green = Normal operation (Vehicle Ignition OFF)
Quick Flashing Green = Bootloader Mode (Updating Firmware) - Connect to software to complete the update
Solid Red = Recovered from failure - Connect to software to complete the recovery
Flashing Red = Tripped Fuse - Cycle ignition to reset the fuse - If trips again connect to the software to increase the fuse value
Solid Green & Flashing Red = Application Firmware Corrupt - Connect to Software to update firmware
Solid Red & Solid Green = Device authentication failure - Device has been deactivated
Flashing Red & Flashing Green = Data fault - missing CANbus data - Confirm that you are connectedd to the correct CANbus port