BWI FAMILY OF BRANDS ▼
-
Shop
- Forward Lighting Bundles
- Rear Visibility Bundles
- Driving Lights
- Headlights
- LED Bulbs
- Fog Lights
- Brake Lights
- Turn Signals
- Daytime Running Lights
- Amber & Yellow Lens Kits
- Driving Light Wiring
LED Lighting
-
Explore
- News
- Why Choose DENALI
- 2.0 Lighting Technology
- Beam Patterns
- How to aim
- Product Certifications
- Replacement Parts
- 2026 Catalog Download
DENALI 101
- ADV Moto Outfitting Guides
- Enduro Moto Outfitting Guide
- Street & V-Twin Outfitting Guides
- Side X Side Outfitting Guides
- 4x4 Outfitting Guides
Outfitting Guides

- Dealers
- About Us


Shop by Vehicle
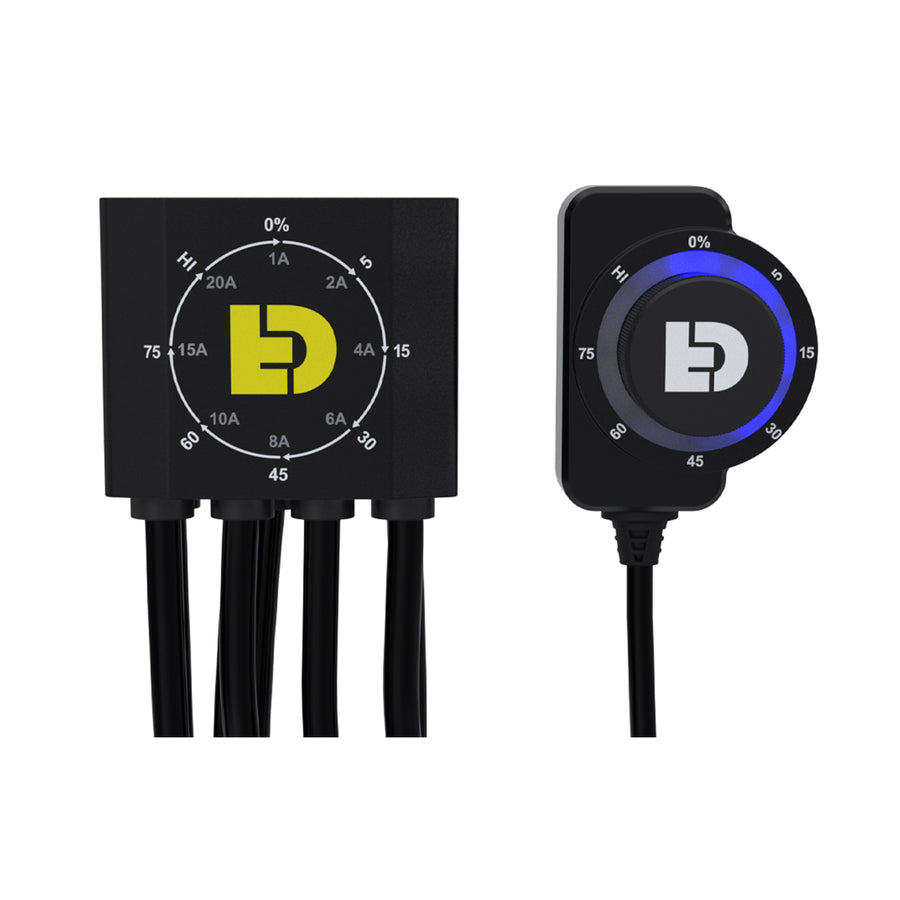
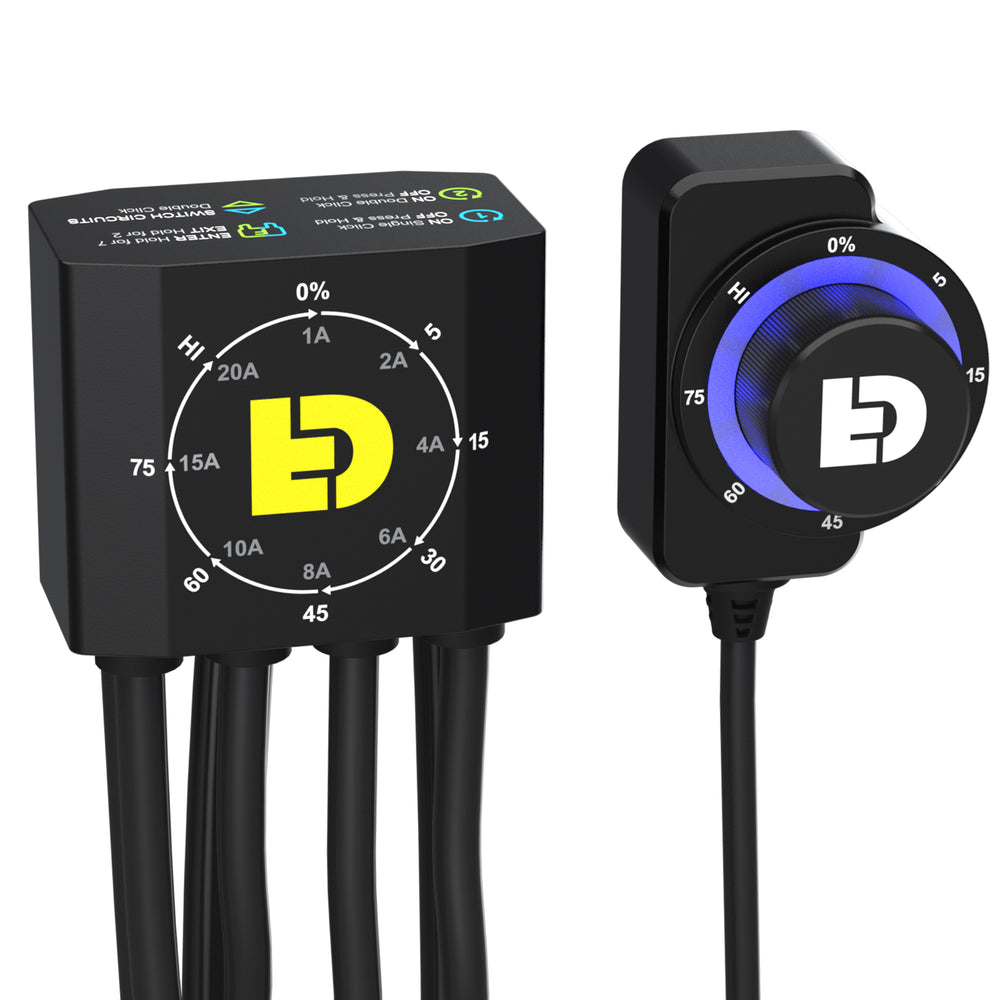
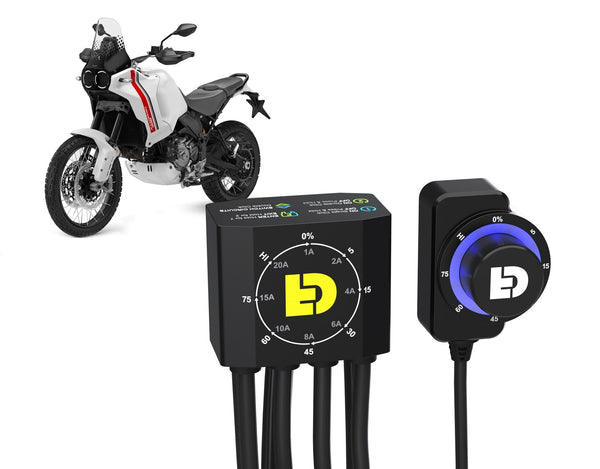
DialDim™ Lighting Controller
Setting a new standard in LED light dimming and control!
One Switch, Two Circuits, Infinite Control
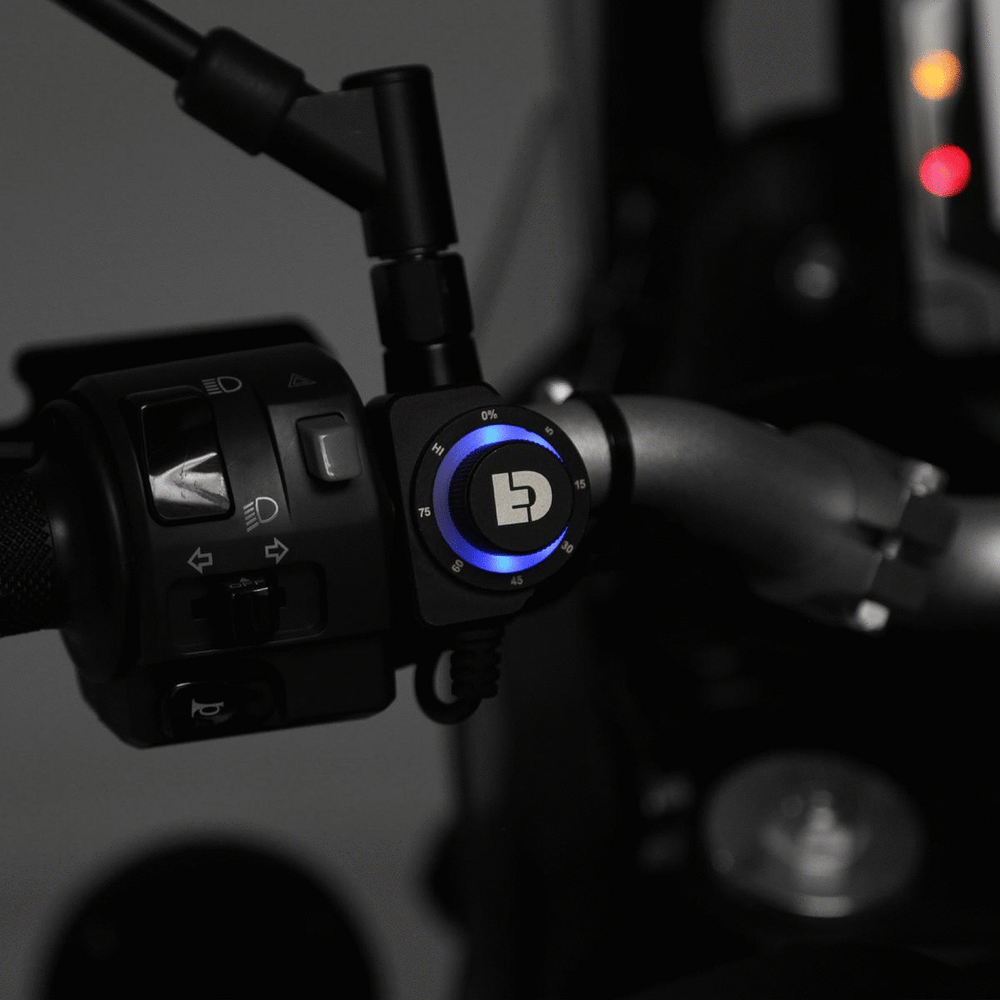
Our ground-breaking DialDim™ Lighting Controller features a multicolor halo dimming switch that allows you to independently turn on/off and dim two sets of auxiliary lights from a single consolidated wiring harness. The LED halo switch displays your exact settings and allows for effortless dimming on the fly. The blue halo controls light set one and the green halo controls light set two; simply double click to switch between the two circuits.
The controller also features high beam, turn signal, and horn inputs to unlock intelligent flash features that can cancel your aux lights with your turn signal, flash your aux lights as a turn signal, or strobe your lights when you sound your horn.
DialDim™ Lighting Controller - Universal Fit
- Regular Price
- $279.99 USD
- Sale Price
- $279.99 USD
- Regular Price
-
$279.99 USD
- Unit Price
- per
DialDim™ Lighting Controller for Ducati DesertX
- Regular Price
- $314.99 USD
- Sale Price
- $314.99 USD
- Regular Price
-
$314.99 USD
- Unit Price
- per
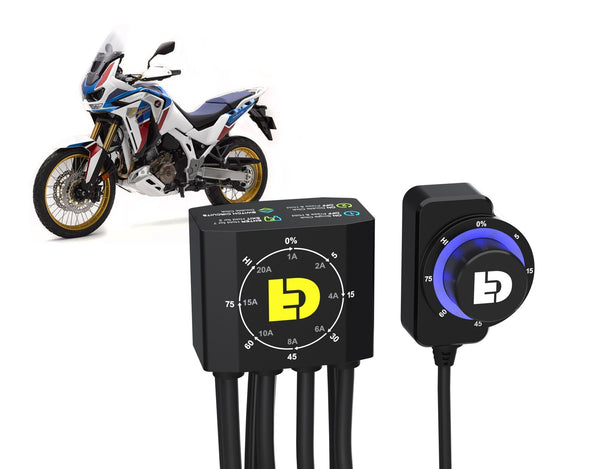
DialDim™ Lighting Controller for Honda Africa Twin 1100
- Regular Price
- $329.99 USD
- Sale Price
- $329.99 USD
- Regular Price
-
$329.99 USD
- Unit Price
- per
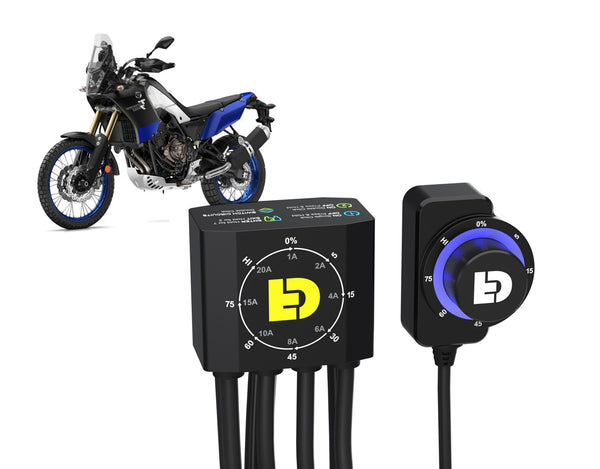
DialDim™ Lighting Controller for Yamaha Tenere 700
- Regular Price
- $319.99 USD
- Sale Price
- $319.99 USD
- Regular Price
-
$319.99 USD
- Unit Price
- per
More Features, More Feedback
Our patent-pending multicolor halo dimmer switch can do a whole lot more than just turn your lights on and off and dim them. For starters, it displays the exact intensity of both of your lights so you're never stuck guessing if your lights are on, or what intensity they're set to.
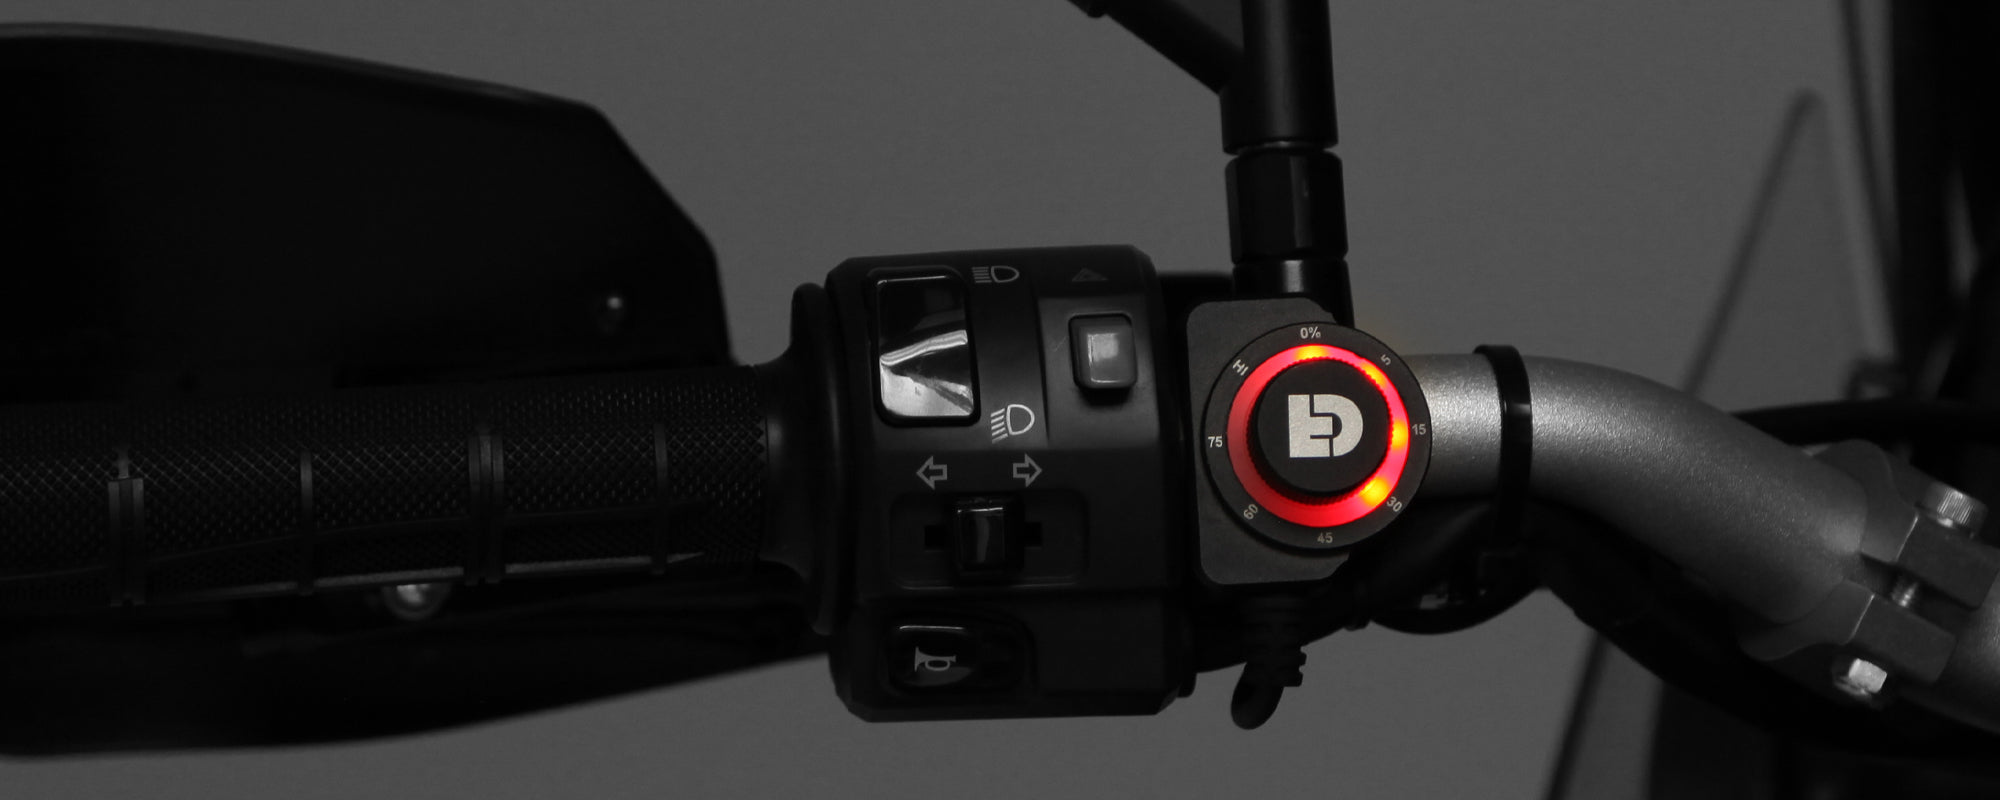
Thanks to the electronically fused circuits, the halo switch can also display, and allow you to select, the fuse values for each circuit. And if a fuse trips, the LED halo will turn red providing realtime feedback and allow for resetting the fuse.
Last but not least, the switch halo doubles as a battery monitor with a low-voltage cutoff feature. Our industry-first design will flash different colors on startup to display your battery health and automatically shut off your auxiliary lights if the battery voltage drops below 10.8 volts.
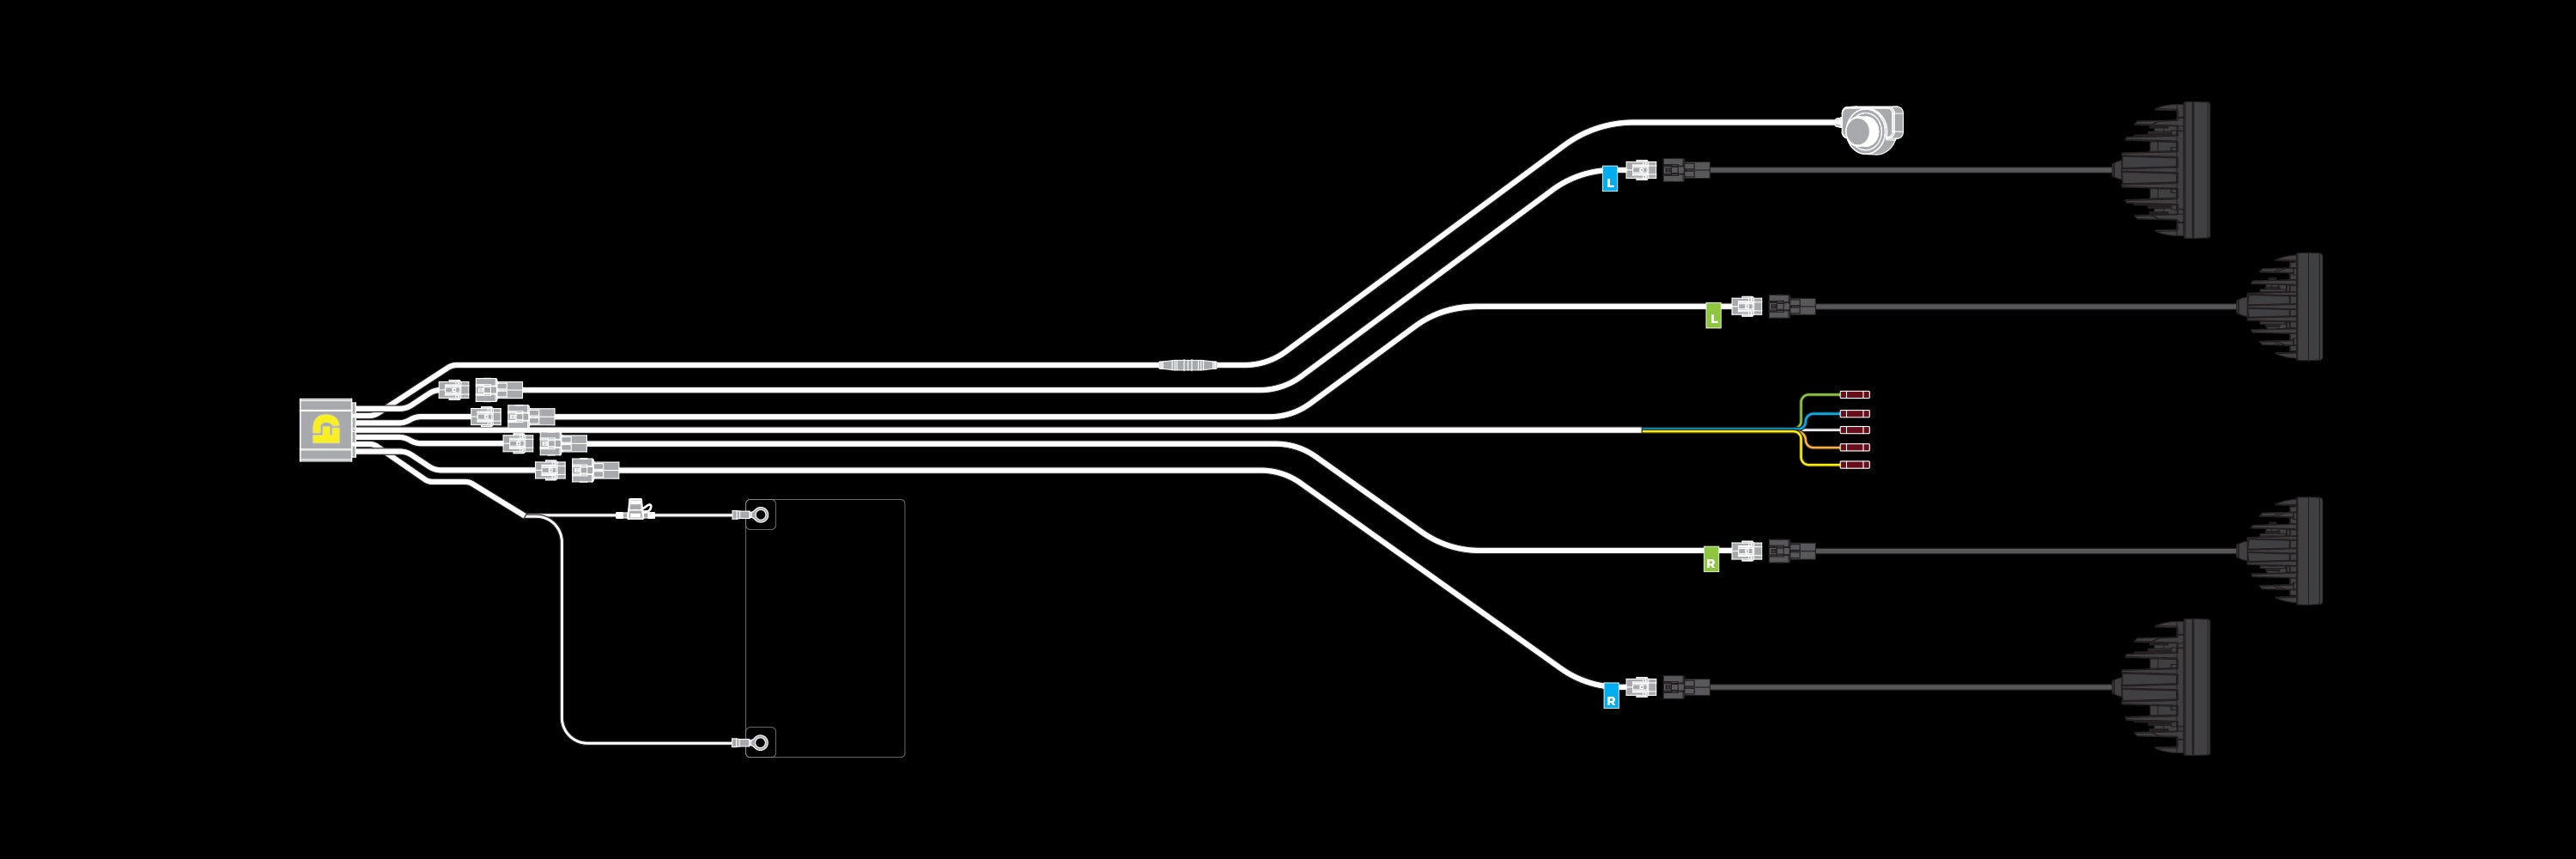
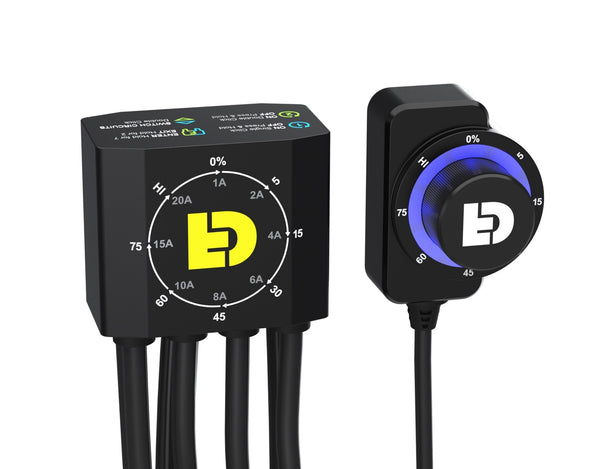
DialDim™ Harness Overview
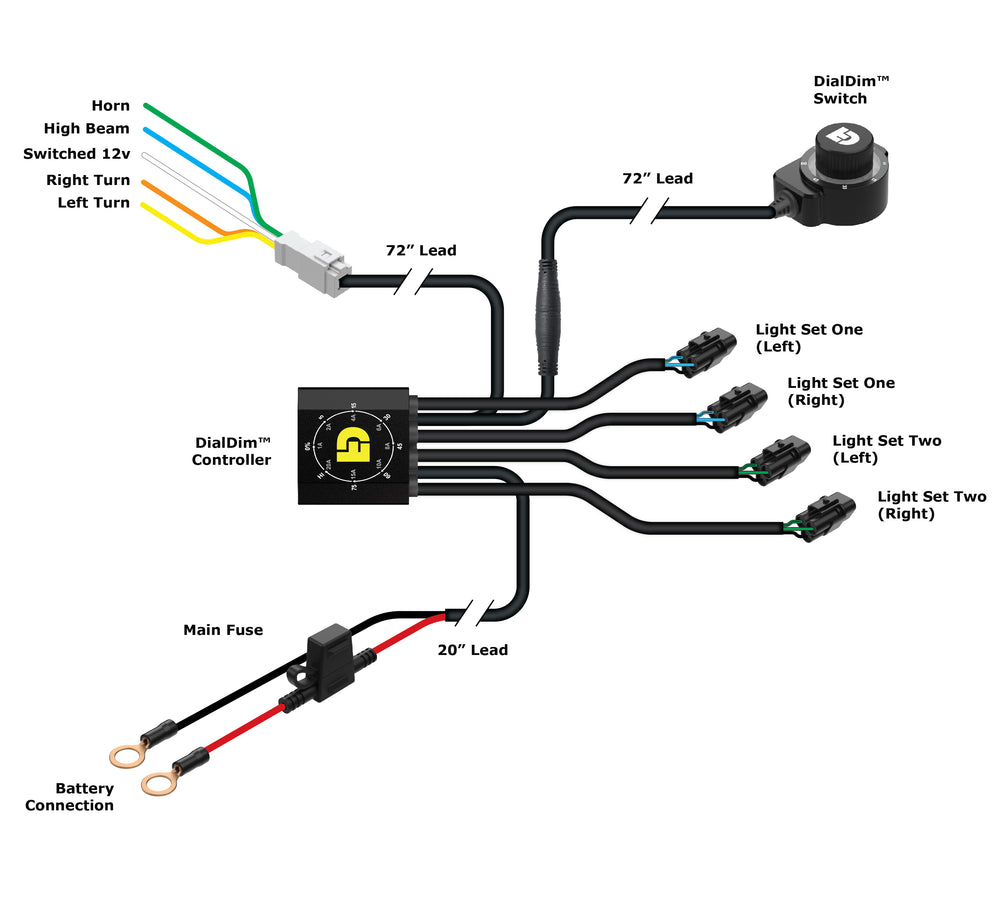
The dedicated light outputs are labeled and color coded so adding one or two sets of lights to you vehicle couldn't be any easier. Connect your main lights to the blue leads and your 2nd set of lights (typically fog or visibility lights) to the green leads.
Then simply connect the ring terminals to the vehicle battery and the white 12v input wire to a switched power source. To enable the high beam sync, turn signal flashing features, or horn flashing features simply connect the input wires to the corresponding circuit on the vehicle.
In addition the controller harness and switch, the kit includes (4x) five foot plug-&-play light extensions and a handlebar switch mount. Simply add the light pods and your ready to ride!
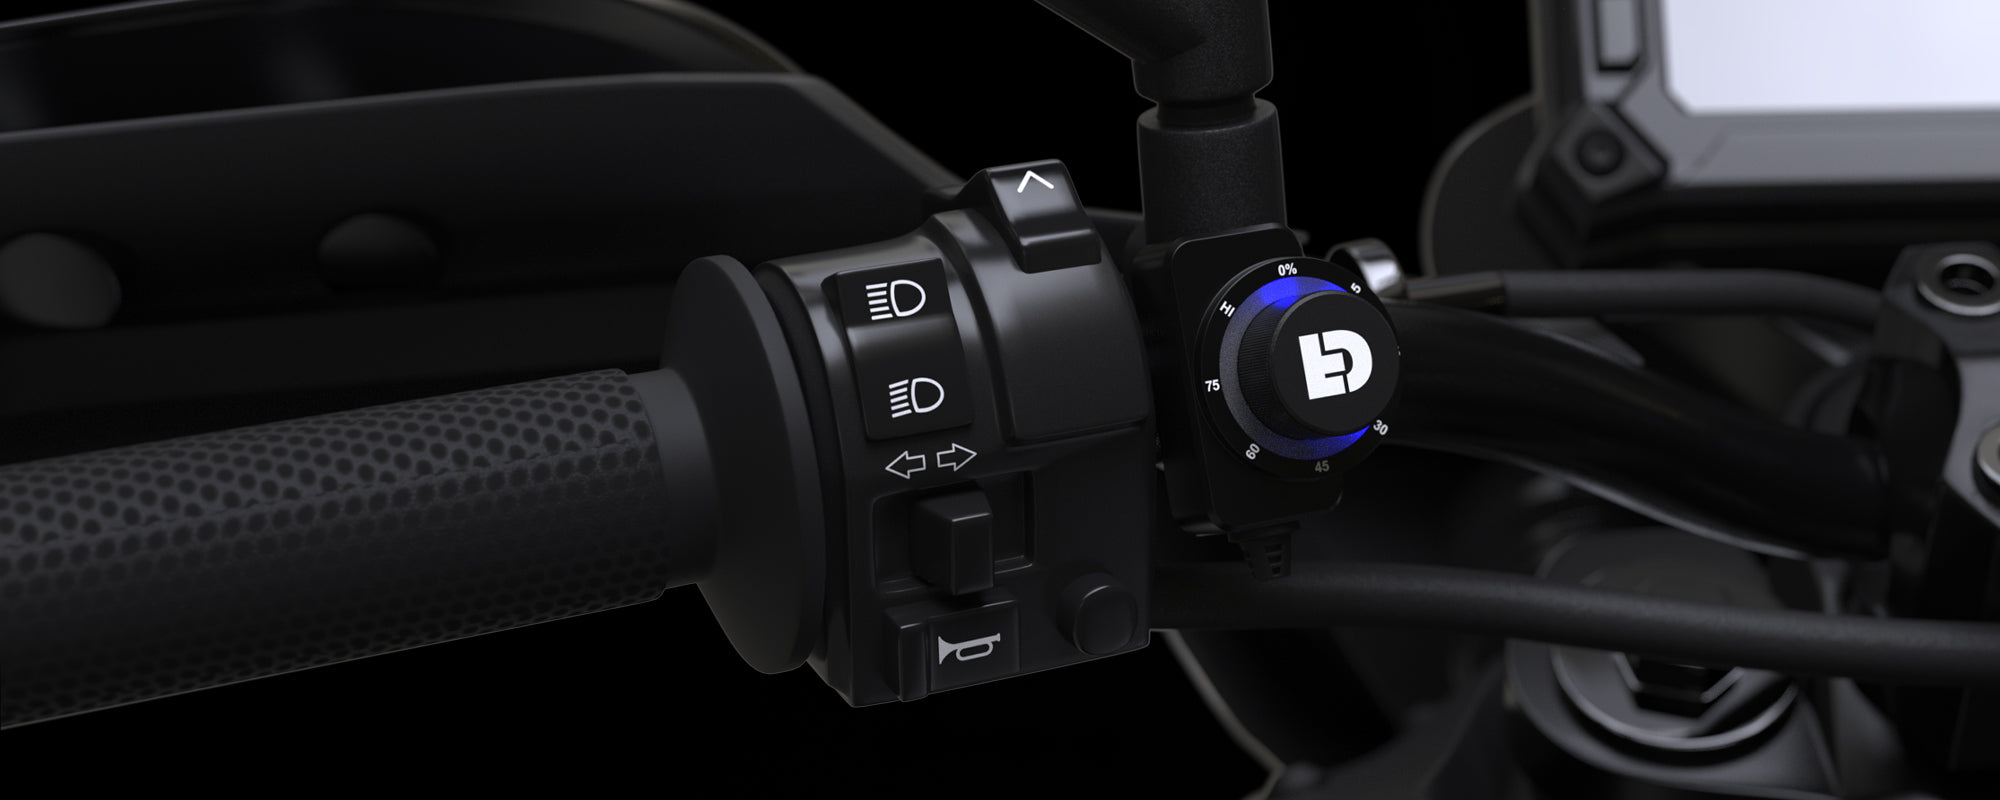
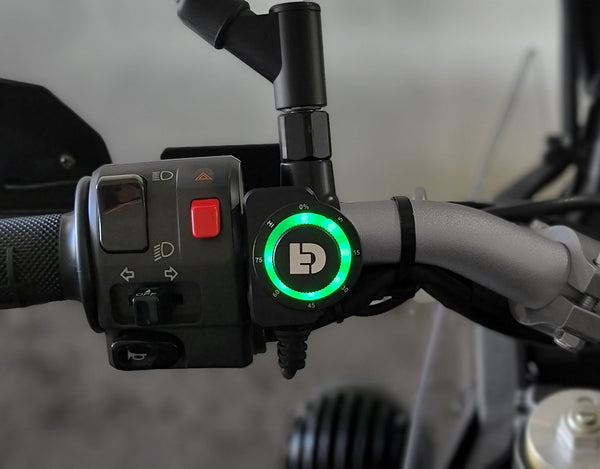
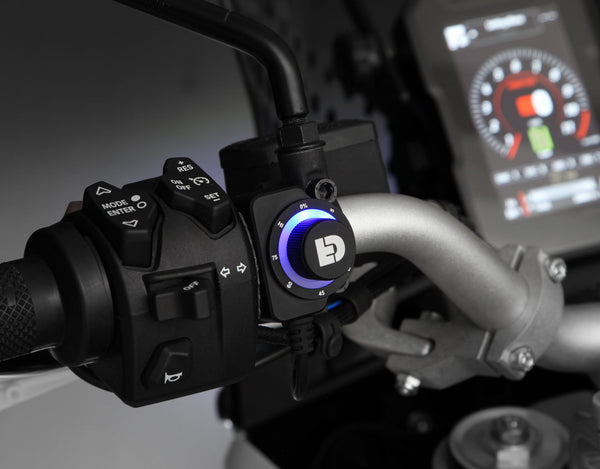
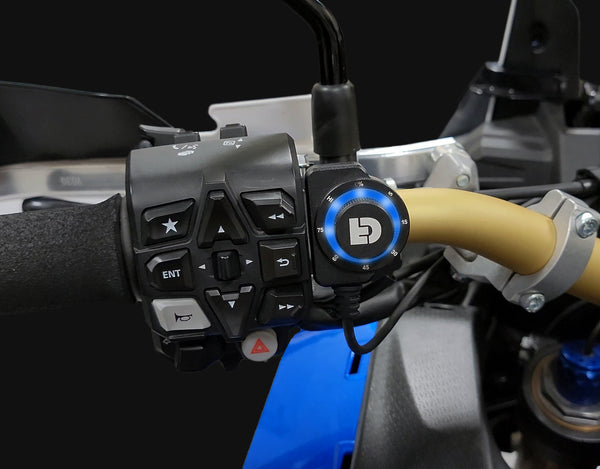
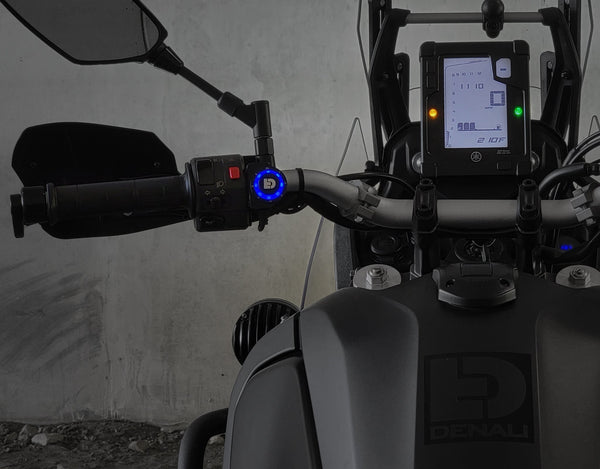
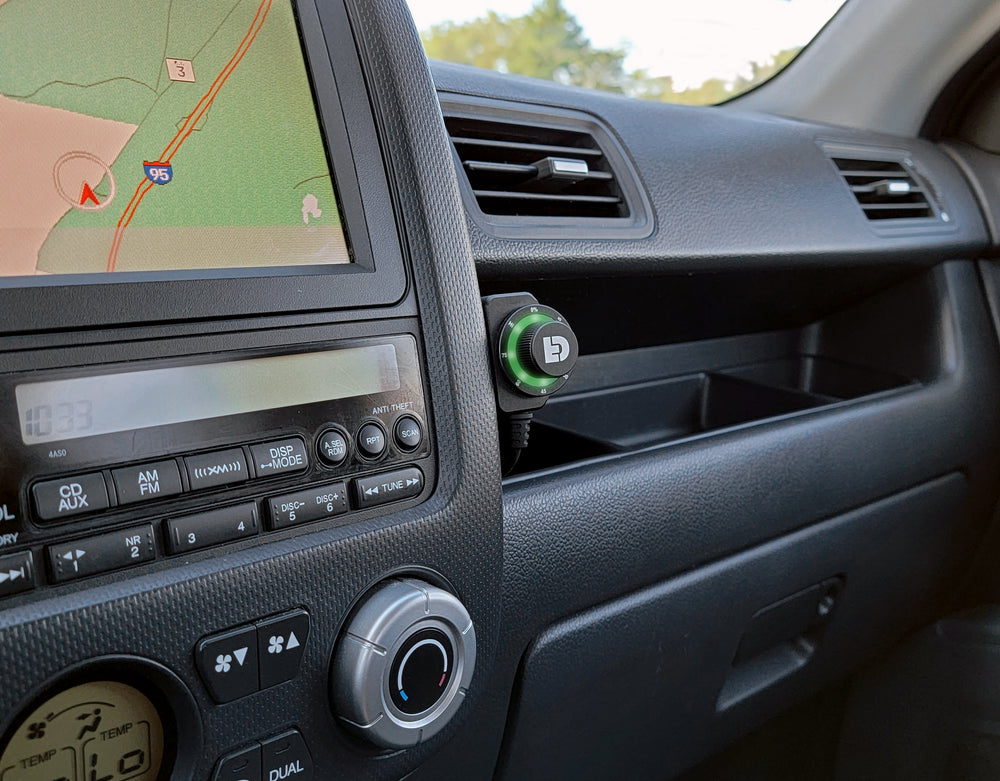
Modular Mounting, Universal Design
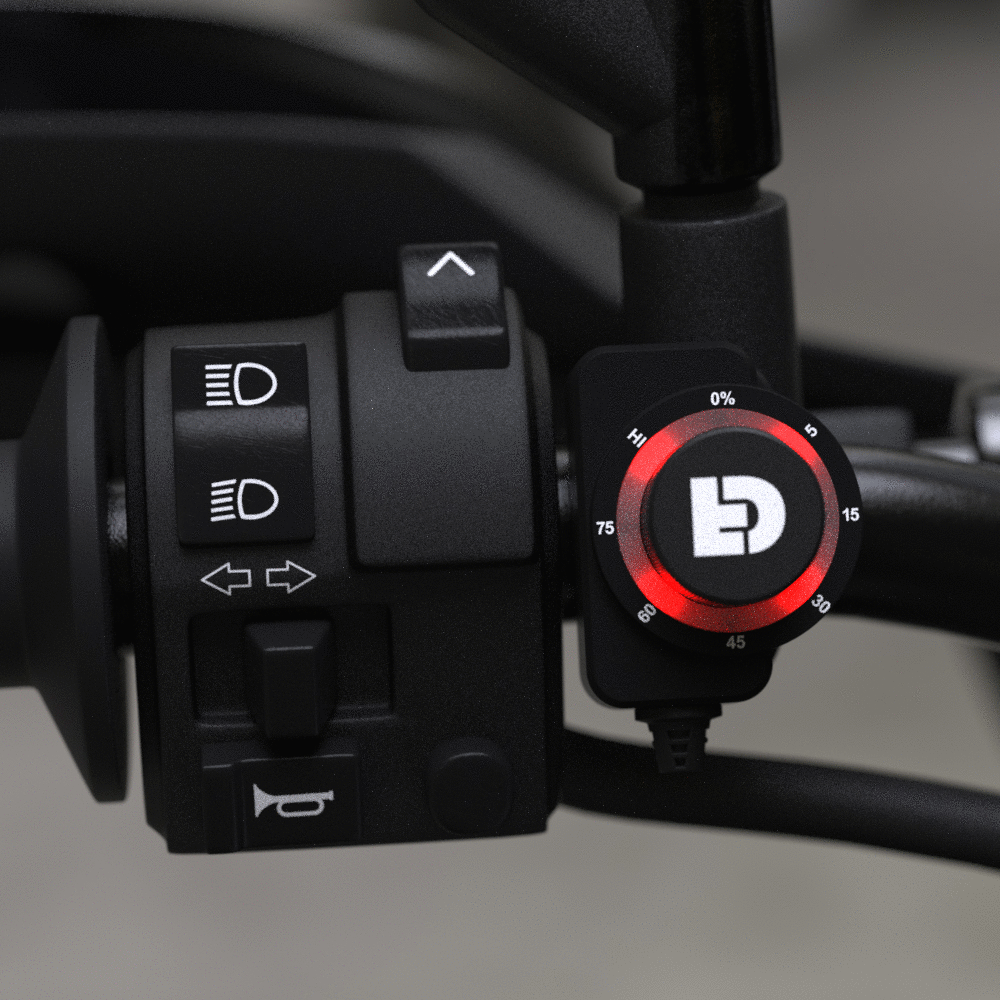
We engineered our DialDim Lighting Controller with all of your outdoor adventures in mind. Our patent-pending dimmer switch is designed to be handlebar mounted or surface mounted in both the horizontal or vertical position.
The space-saving design is ideal for ATVs, Side by Sides, Jeeps, and Trucks (in addition to motorcycles) by enabling independent control of two sets of lights from a single switch.

DENALI® DialDim™ Lighting Controller - Our Unique Features
On/Off & Dim
Independently control two sets of lights on/off and intensity level using the single DialDim™ Switch. The blue halo controls light set one and the green halo controls light set two. Double click to switch between the two circuits.
High/Low Sync
Your auxiliary lights will automatically switch between your selected dim setting to full intensity with the factory high beam switch. Simply connect the blue input wire to your vehicle high beam circuit to enable this feature.
Stealth Mode
A clever 0% dim setting on the switch allows your lights to be "off" during normal driving conditions but will jump to 100% intensity with your vehicle high beam switch. The lights will also react to turn signal and horn inputs in this mode but will remain off when no inputs are detected.
Cancel with Turn Signal
When enabled the main lights (blue circuit 1) will cancel in sync with your signal to prevent "washing out" your factory turn signal. Simply connect the yellow and orange input wires to your vehicle turn signal circuit to enable this feature.
Flash as Turn Signal
When enabled your amber visibility lights (green circuit 2) will flash in sync with your factory turn signals. Simply connect the yellow and orange input wires to your vehicle turn signal circuit to enable this feature.
Strobe with Horn
When enabled your auxiliary lights on both circuits will strobe at 4Hz when you sound your horn. Simply connect the green input wire to your vehicle horn circuit to enable this feature.
Electronically Fused Circuits
Both light circuits are electronically fused and can be set right from the switch itself! The halo will illuminate red to notify you when a circuit fused is tripped.
Voltage Display Indicator
Upon vehicle startup, the switch halo will flash green to indicate a healthy battery voltage, or flash red to indicate a battery voltage that is below 11.8v.
Low Voltage Cutoff
If battery voltage drops below 10.8v the lights will not power on preventing you from being stranded. The switch halo will flash 4 red LEDs to indicate the low voltage condition.
Intuitive Lighting Control
Easy to operate and easy to read multifunction switch
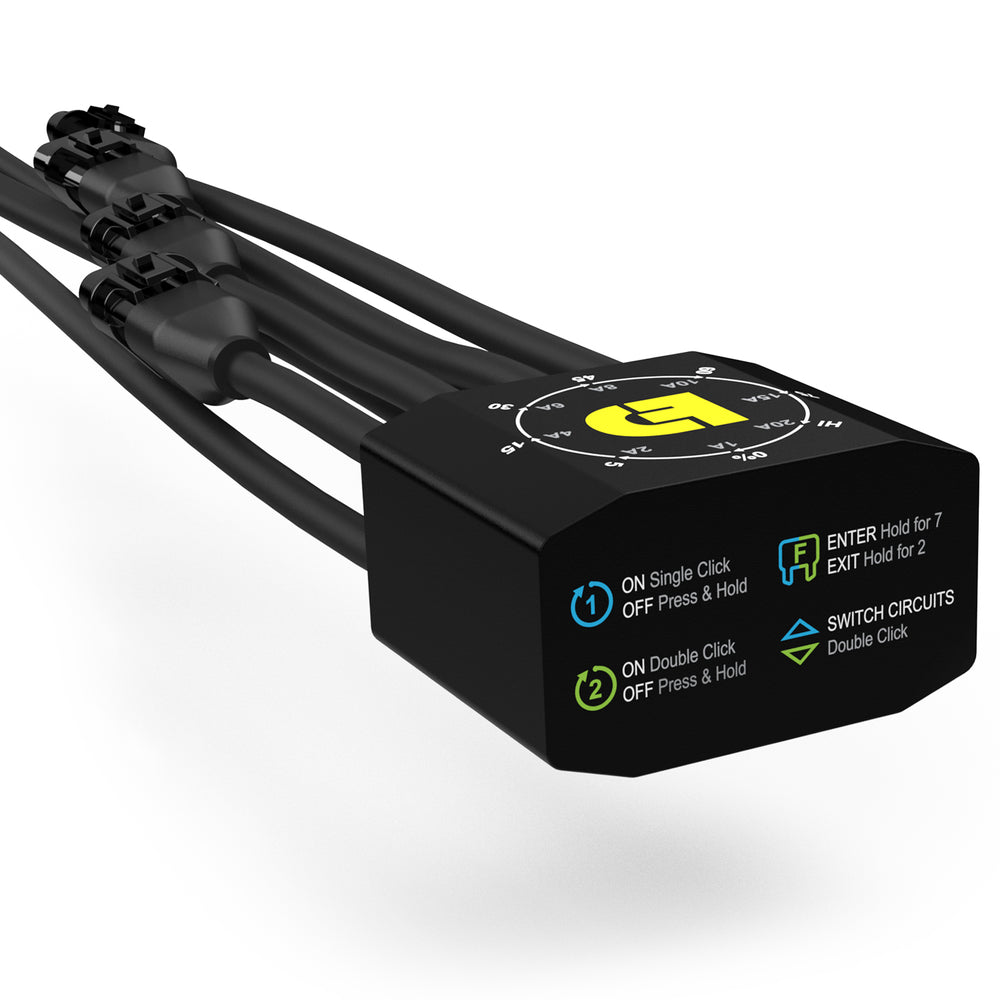
Operating the Multifunction Switch
The switch functions are easy to remember, but we went ahead and printed it on the back of the controller housing anyway (just in case you forget)!
Light Set One:
Single click ON --> Press & Hold OFF
Light Set Two:
Double Click ON --> Press & Hold OFF
Switch Between Circuits: Double Click
Fuse Setting Mode:
7 second hold ENTER --> 2 Second Hold EXIT
Reading the Halo Display
Start Up Flash Sequence
Green Flash on Start Up: Battery voltage above 11.8v
Red Flash on Start Up: Battery voltage below 11.8v
Red Flash (4 LEDs) on Start Up: Battery voltage below 10.8v. Low voltage cutoff mode. The lights will not turn on if voltage is below 10.8v.
Lighting Control
Steady Blue: Light set one operation & status
Steady Green: Light set two operation and status
Fuse Status & Setting
Solid Red: Tripped fuse (on the circuit that turned red). Press and hold for 7 seconds to enter fuse setting mode.
Blue Flashing: Fuse setting mode (circuit one)
Green Flashing: Fuse setting mode (circuit tow)
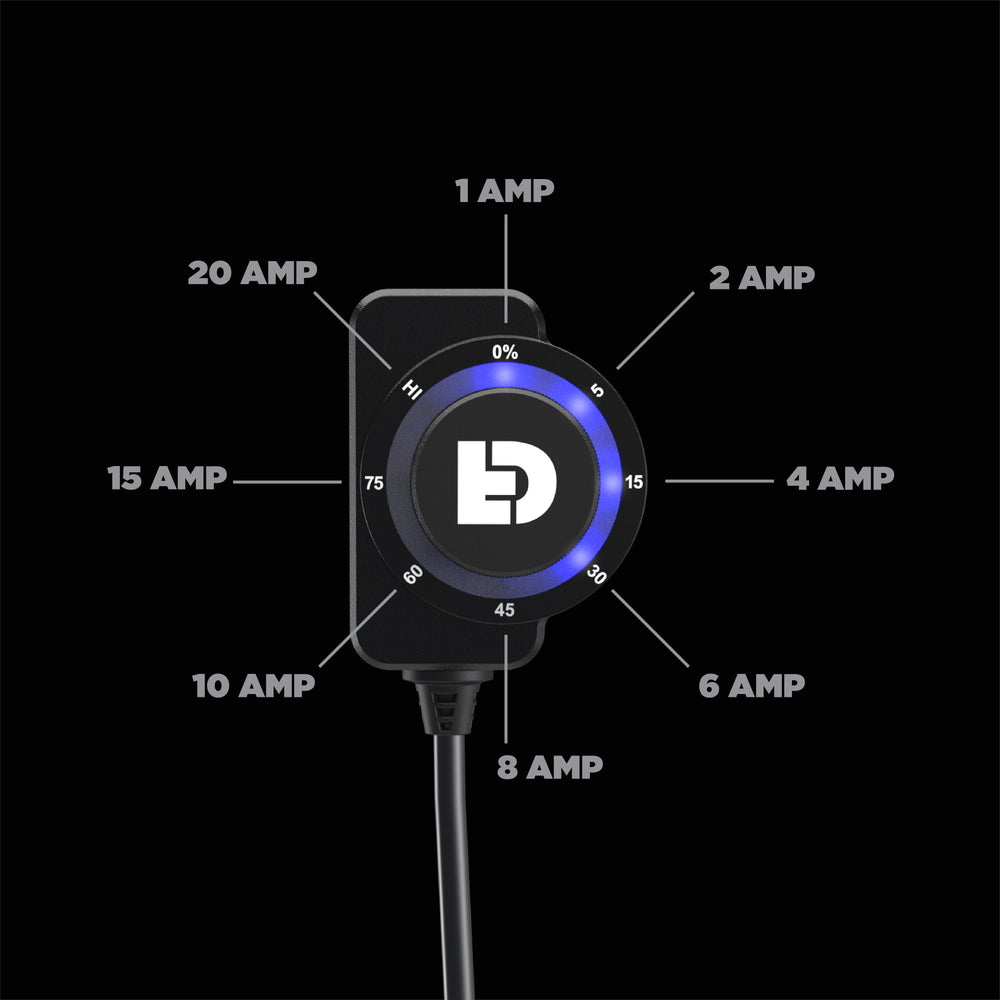
Fuse Setting Mode
To enter fuse setting mode, press and hold for 7 seconds until the blue and green circuits begin flashing.
When the circuits are flashing you can dial up or down to select your desired fuse value.
The eight positions around the halo are repurposed in fuse setting mode to provide 8 fuse options.
Double click to switch between the blue and green circuit.
Press and hold for 2 seconds to exit the fuse setting mode.